It is not uncommon to jump right into a project without taking the time to set it up in a way that will help us achieve our learning objectives. This can be a costly mistake, as it may lead us down a path that doesn't align with our desired outcomes. Therefore, it is important to take a step back before diving into any project to define and understand the project structure, providing us with a clear roadmap to stay focused and track our progress as we move forward. Here I will talk about how I structure my projects to make sure I achieve my learning objectives.

In my previous articles, I covered how I used Project-Based Learning to acquire Android mobile development skills by:
- carefully designing a learning roadmap for my projects that align with my career goals and
- choosing the best source(s) to help translate the learning roadmap into tangible skills.
Now that I have thoroughly planned my project, I am equipped with the necessary information to start confidently implementing my project.
Designing my project
As you may recall from my first article, my project was to create an app store where users can browse, review and download any apps I create. The app store would also have a support channel where users can share feedback, suggestions or discuss any issues they might be experiencing.
While this might sound simple to create, it can get very complex very quickly - especially when considering all the elements and components that I will need to design and create. That is why when designing my projects for learning, I take the following steps to make sure that I am 100% prepared for everything that needs to go into its creation:
#1 Outline practical elements of your project
The first key step you should take when embarking on any project is to outline all the elements and components your project will require. This will give you a clear idea of all the different things you will need to learn, and it will allow you to plan the design of your project.
To implement my app store, I needed to consider the following key elements as part of my project design:
- Platform: Choosing the appropriate platform(s) for my app store - Android in my case.
- **Infrastructure: **Set up the necessary infrastructure for hosting and serving the app store, including servers, databases, and storage solutions.
- User Management: To allow users to register and manage their details.
- User Interface: Design a user-friendly interface that allows users to browse, search, and discover apps easily.
- App Submission Process: Establish a process for developers to submit their applications, including guidelines, documentation, and review procedures.
- Payment Integration: Incorporate payment gateways to enable secure transactions for both purchasing and monetising apps.
- App Management: Develop a robust system for managing and organising the app catalogue, including updates, ratings, reviews, and categorisation.
- Security & Privacy: Implement robust security measures to protect user data and ensure app authenticity, including user authentication, encryption, and privacy policies.
- Monetization: Implement methods for monetising the app store through app purchases, in-app purchases, subscriptions, or advertising.
- Marketing & Promotion: Plan strategies to attract users and promote the app store, including app recommendations, featured apps, and targeted advertising.
- Continuous Improvement: Monitor user feedback, analyse app performance, and iterate on the app store to enhance the user experience and introduce new features.
Remember that these steps can vary based on your specific requirements and goals for your project. If you are unsure of how to determine your project’s key elements, your learning roadmap can help with this.
It is important to note that the initial release of my app did not have all of the key elements above. This is because for project-based learning to be effective, it is best to work on core features and make them as small as possible in the beginning and then add on to them over time as you improve your skills.
However, when designing your project, it's a good idea to focus on the bigger picture and list all the elements your project will need once you reach certain milestones.
For example, in my project, I only implemented the App Submission, Payment Integration, App Management and Monetization processes after reaching 50,000 users. In other words, I waited until I had the market to utilise these processes.
#2 Understand the data flow
Understanding the [data flow](https://www.lucidchart.com/pages/data-flow-diagram#:~:text=A data flow diagram (DFD,the routes between each destination.) of my project is crucial for its successful implementation. It involves gaining insight into how data moves through various components, processes, and interactions within my system.
By mapping out the data flow, I can identify dependencies, bottlenecks, and potential points of failure. This knowledge allows me to design an efficient and scalable structure, implement proper data handling and processing techniques, and ensure data integrity and security.
Furthermore, understanding the data flow helps in optimising performance, troubleshooting issues, and making informed decisions when it comes to data management and integration with external systems. A comprehensive understanding of the data flow is essential for building a robust and reliable solution that meets my project's requirements.
In order to understand the data flow for your project, you can follow a systematic approach:
- Start by identifying the objectives of your project and determining the data sources you need to access.
- Then, develop a data flow diagram that visualizes how data will flow through your system, highlighting all the inputs and outputs.
- Next, identify any data transformation requirements, such as cleansing or normalisation, and plan how data will be stored and retrieved.
- Create a data flow model to graphically represent the flow of data, and select and test the appropriate tools for data management and analysis.
- Finally, thoroughly test and refine your data flow process before implementing it in your project.
By following this step-by-step approach, you can effectively map out the data flow for your project and ensure a smooth and efficient flow of information.
Here's an illustration of the data flow for my app store:
- User Interface: The user navigates the app store using a mobile or web interface and interacts with various features, such as search, filters, categories, and recommendations.
- App Catalogue: The app store catalogue displays a range of applications that are available for users to download, including app descriptions, and reviews.
- App Submission: Developers submit their applications to the app store, which undergoes a review process to ensure compliance with app store guidelines and policies.
- Database: The app store uses a database to manage and store information related to the app catalogue, user accounts, and app analytics.
- Payment Gateway: Users can purchase or subscribe to apps through secure payment gateways that manage transactions and financial records.
- App Management: The app store manages the app catalogue, updates, and user feedback through a content management system that includes tracking app analytics and reviews.
- Integration with Operating Systems: The app store has integrations with mobile operating systems to enable app downloads, notifications, and updates.
Overall, the data flow for a project can involve a complex network of interactions between users, developers, databases, payment gateways, and operating systems. The data flow enables the efficient and secure distribution of applications, and also involves app discovery, management, and monetisation.
Data modelling
Data modelling is an essential step in any project, as it involves defining the structure of your data. It encompasses the process of identifying and organising the data elements that will be stored and manipulated within your system.
By defining the data structure, you establish relationships between different data entities and specify the attributes and properties associated with each entity. This helps in ensuring data consistency, integrity, and accuracy throughout the project's lifecycle.
Additionally, data modelling allows you to optimise data retrieval and storage, as well as facilitate effective data analysis and reporting. Through thoughtful data modelling, you can design a robust and scalable system that effectively handles your project's data requirements and supports efficient data management and processing.
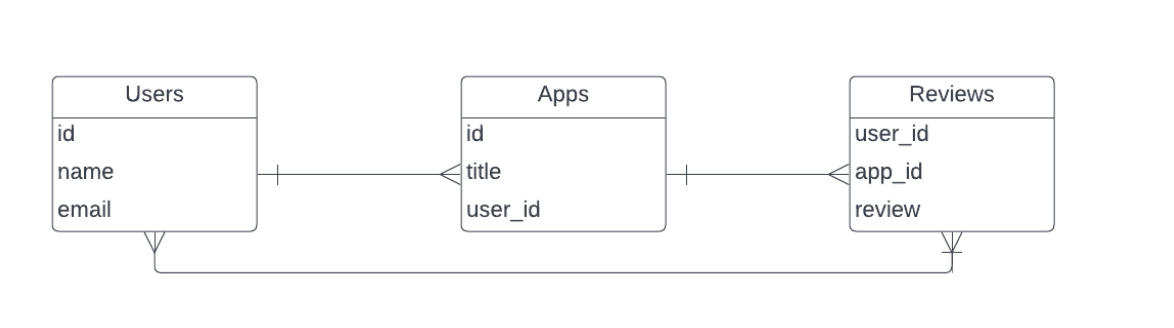
Here's an example of a data model for my app store:
I have three entities: Users, Apps, and Reviews. Each user can have zero or more apps and can leave zero or more reviews for an app. Each app can have zero or more reviews associated with it.
The data model can be represented using an entity-relationship diagram:
Note: If you are unfamiliar with entity-diagrams, you can learn more about them here.
In this diagram, the Users table has a one-to-many relationship with the Apps table, indicating that a user can have multiple apps, but an app can have only one user. The Apps table also has a one-to-many relationship with the Reviews table, meaning that an app can have multiple reviews, but a review is associated with only one app. The Users and Reviews tables have a many-to-many relationship, indicating that multiple users can leave reviews for multiple apps.
Additionally, the diagram shows the attributes associated with each table, such as user name, app title, review text, and so on.
This data model provides a structured approach to store and retrieve information related to the app store. It allows for efficient tracking of app ownership, user reviews, and their associations. Using this data model as a foundation, I can build a robust project that supports various features, such as app discovery, user management, and review analysis.
Data modelling provides a blueprint for organising and structuring data, guiding the database implementation process. The data model defines the tables, columns, relationships, and constraints, which are then translated into the physical database schema. The relationship between data modelling and database implementation is crucial, as a well-designed data model ensures efficient and accurate data storage, retrieval, and management.
Understanding the project structure
When working on a project, it is crucial to grasp the project structure provided by the framework you are working with. This understanding helps in navigating through the different components of the codebase and ensures efficient development. The project structure defines the organisation of different files and folders, providing a clear hierarchy and logical arrangement.
By familiarising oneself with the project structure, you can easily locate specific files, understand dependencies, and identify the flow of data within the framework. Ultimately, a solid understanding of the project structure sets the foundation for a successful and organised development process.
Here’s an example of a sample project structure for an Android project:
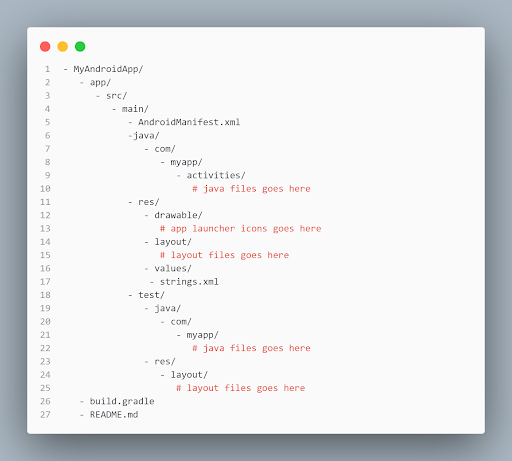
In this sample structure, the main project directory is named "MyAndroidApp". Inside the "MyAndroidApp" directory, we have the main application logic in the "app/src/main" directory. The "java" directory holds the Java source code for activities, adapters, models, and utility classes. The "res" directory holds XML files for layouts, drawable resources, and string values. The "test" directory contains unit tests for activities. Other files like "AndroidManifest.xml" describe the application's components and permissions, "build.gradle" specifies project dependencies and build configurations, and "README.md" contains project documentation.
Building my project
Building my project and achieving my learning objectives for Android mobile development go hand in hand.
Here are the step-by-step actions I took to achieve my learning objectives for Android mobile development:
- Acquire skills in mobile development:
- Started by learning the basics of Android development, such as Java programming language and XML for layout design.
- Used my primary and secondary Android development sources to gain comprehensive knowledge and practical skills.
- Validate your work outside of professional projects:
- By creating this app I have created a personal portfolio to showcase my other Android apps and projects that will be shared on Xposed repository to receive constructive criticism and suggestions for improvement.
- Become a better developer:
- By breaking down my project design into phases, I am continuously challenging myself by taking on more complex requirements and exploring advanced concepts in Android development.
- Engaging with my users, both giving and receiving feedback from them to improve my skills.
- Build a user base:
- I have already identified my target audience and their needs. This allows me to focus on creating Android applications that offer value and solve their problems.
- Encouraging user engagement and feedback through features like in-app ratings, review prompts, and user surveys to continuously improve my app.
Remember, achieving these learning objectives requires dedication, continuous learning, and practice. Stay persistent, seek opportunities to learn and grow, and don't hesitate to reach out to other developers/mentor(s) for guidance and support.
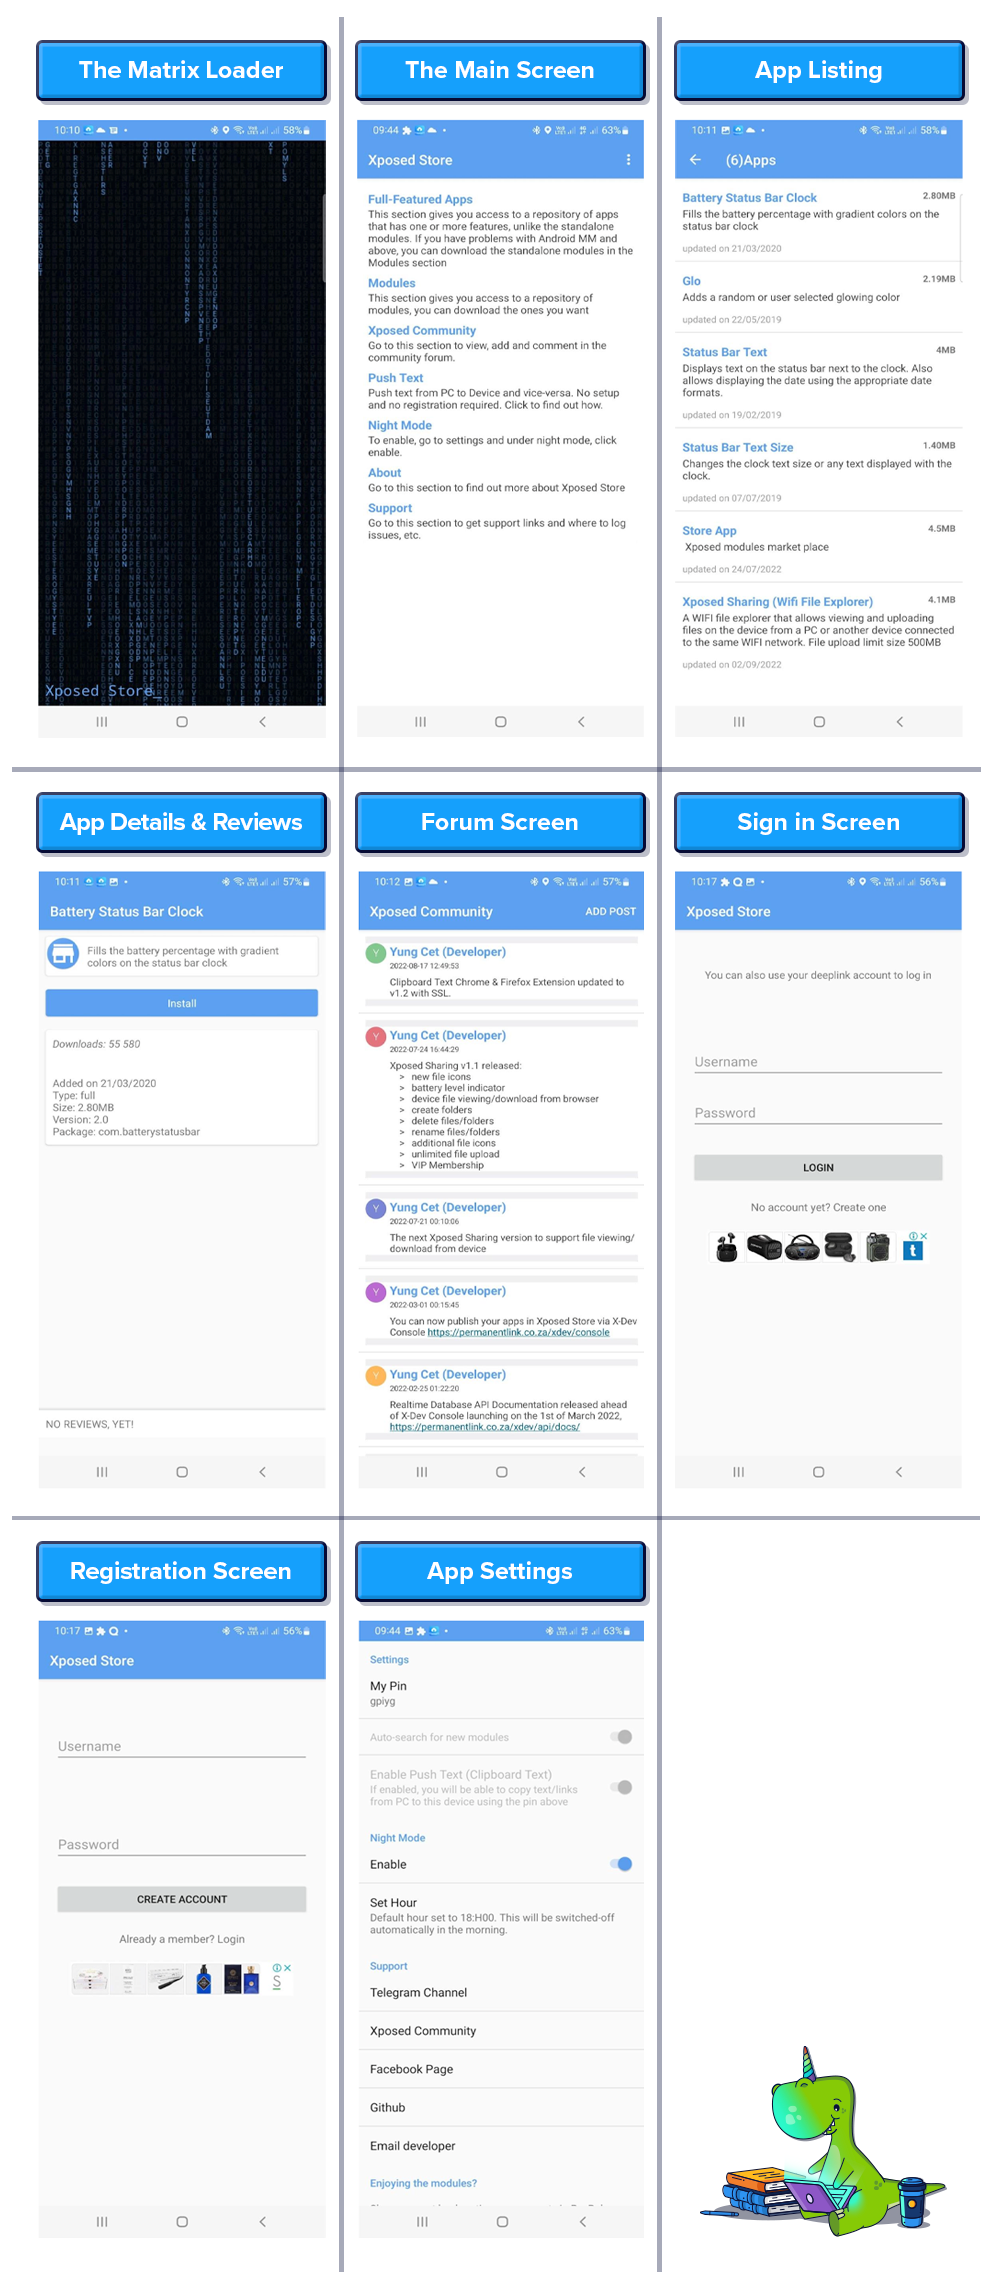
My project is going well so far. I have been making steady progress and have implemented all of my project design steps. My user base is growing each day and my confidence as a developer has grown exponentially. Below are screenshots of what my project looks like:
Conclusion
Setting up a project with clear learning objectives is a crucial step in ensuring its success and aligning it with our desired outcomes. By defining the project structure and understanding the data flow, we create a detailed roadmap that guides us towards achieving our goals effectively.
By staying focused, challenging myself with more complex requirements, and actively seeking user feedback, I am continually evolving as a developer and enhancing the user experience. This has taught me the importance of continuous improvement and engaging with users to refine my skills and offer valuable solutions.
I hope to inspire others to embark on their own learning journeys and make strides in whatever they’re trying to learn.