In my free time, I brew beer, which requires a relatively consistent temperature during fermentation for the best results. When I wasn’t at home, I needed to find a way to monitor this. Here’s how I leveraged the power of the Telegram bot API, in combination with some cool IoT stuff, to create a system to monitor ambient room temperature, which can be queried with a simple Telegram message. I’ll share code snippets and circuit designs along the way to make it easier for you to get set up to build your own IoT-driven bots.

During lockdown, I decided to brew my own beer. When I was working from home, it was easy to get up from my desk throughout the day and check the temperature of my brew manually. However, when I started going back into the office I needed to find a way to monitor the temperature in our kitchen remotely so that the brew wouldn’t spoil. I wanted to create an automated system that would allow me to easily store historical data for later analysis, and so I set out to build a little IoT system with a temperature sensor.
Around the same time, I heard about the Telegram bot API, which sounded like an interesting and simple mechanism of querying for updates. Rather than coding up a web app and setting it up to be publicly accessible, it would allow me to set up a Telegram poller that reads updates, processes them locally and then sends back a response without any extra network administration.
In this article, I’ll share with you how I set up my temperature monitoring system, which I’ve named ‘Thermobot’. If you’d like to follow along and build your own IoT-powered bot, you’ll need a few hardware items:
- ESP8266 microcontroller
- A micro-USB cable
- DS18B20 temperature sensor and 4.7k Ohm resistor
- Three differently coloured LEDs (I used red, yellow and green) and corresponding resistors (I used 3mm LEDs from a kit paired with 100 Ohm resistors)
- Some jumper wires
- An electronics breadboard (I used a 53 row 2/5/5/2 column one)
- A computer that can be connected to the same local network as the ESP8266 to act as a server
With all of this together, we can launch into the code.
Setting up your server
We’ll start by getting our server up and ready to process and store data. In the past, I’ve found MongoDB really easy to get set up and work with, so I decided to use it for the data storage solution. There’s a Python client for MongoDB, PyMongo, that I found made interacting with the database simple. I also found Flask to be the simplest web server framework to get started with, so I decided to base my system on that.
As a first step, we need to create a requirements.txt file inside a thermobot folder and add pymongo and flask on separate lines. I also created an empty file named __init__.py to explicitly define this as a Python module.
pymongo~=3.11.2
flask~=1.1.2
After this, we’ll create a db_server folder inside the thermobot folder, containing a main.py file. Again, I created an empty __init__.py file. Inside main.py, start by importing flask and pymongo. We then set up MongoDB by creating a MongoClient object, with the connection URI mongodb://mongo:27017, which just means that our MongoDB database will be running locally on the port 27017. We’ll then create a database called thermobot and a temperatures collection under that database.
from flask import Flask, request
import pymongo

# Set up MongoDB stuff
client = pymongo.MongoClient('mongodb://mongo:27017/')
thermobot_db = client['thermobot']
temperatures_collection = thermobot_db['temperatures']
Setting up a Flask application to process temperatures
Next, we’ll create a Flask application and define a single route, /api/temperature, with GET and POST as supported request types. If we receive a POST request, we’ll retrieve the body in JSON format and insert a new document in the temperatures collection with the timestamp and temperature values. To keep things simple, I skipped doing any validation or error handling here, though it would definitely be a good idea to do so when building a more robust system. If we receive a GET request, we’ll simply find the newest document in the temperatures collection, by sorting in a descending order on the timestamp value. We’ll return a dictionary with just the temperature. Finally, to make this actually work, we’ll run the app, with a host value of 0.0.0.0.
# Create flask app
app = Flask(__name__)

# Handle /api/temperature route
@app.route('/api/temperature', methods=['GET', 'POST'])
def temperature():
    if request.method == 'POST':
        data = request.get_json()
        temperatures_collection.insert_one({
            "timestamp": data['timestamp'],
            "temperature": data['temperature']
        })
        return "Successfully recorded temperature!", 200

    elif request.method == 'GET':
        temp = temperatures_collection.find().sort('timestamp', pymongo.DESCENDING).limit(1)[0]['temperature']
        return {
            "temperature": temp
        }

if __name__ == '__main__':
    app.run(host="0.0.0.0")
Docker for robust deployments
In the interest of making deployment simple and robust to different server environments, I decided to containerise my system with Docker. If you’re not familiar with Docker, I’d highly recommend reading up on it as it’s a great tool to add to your collection. As a quick overview, it’s basically a way of generating containers, which are lightweight and largely isolated environments. This allows reliable execution of code without having to manage dependencies on the host machine. Container environments are defined by images that are built based on Dockerfiles, which specify a base image to start from, followed by a series of commands that are run to generate the final environment.
FROM python:3.9.1

COPY ./thermobot/ /thermobot/

RUN pip install -r /thermobot/requirements.txt

EXPOSE 5000

CMD [ "python", "/thermobot/db_server/main.py" ]
In the Dockerfile code above, we start with the python:3.9.1 image as a base, which is just a basic Ubuntu environment with Python 3.9.1 installed. Then, we copy our code from the host into the image and run a pip install to get our dependencies set up. We then expose port 5000, which is the port on which our Flask app runs. Finally, we set a default command to run when the container is started. In this case, we just want to start our server.
Of course, we still need to get MongoDB set up and playing nicely with our Flask application. Luckily there’s a public Docker image available for that! At this point, we’re talking about running multiple containers with a dependency link – we need the MongoDB store to be running first for our application to work. While we could run these individually with the right arguments, I found that there’s a tool that will work better: docker-compose. With docker-compose, we can write a YAML file – docker-compose.yml – that specifies the details of each container and the links between them. Then, we just have to run a single command, docker-compose up, and it takes care of everything.
version: '3.8'

services:
  backend:
    container_name: thermobot-backend
    restart: always
    build:
      context: .
      dockerfile: Dockerfile.backend
    ports:
      - '5000:5000'
    links:
      - mongo
  mongo:
    container_name: mongo
    image: mongo
    ports:
      - '27017:27017'
    volumes:
      - /data/db:/data/db
Testing the API
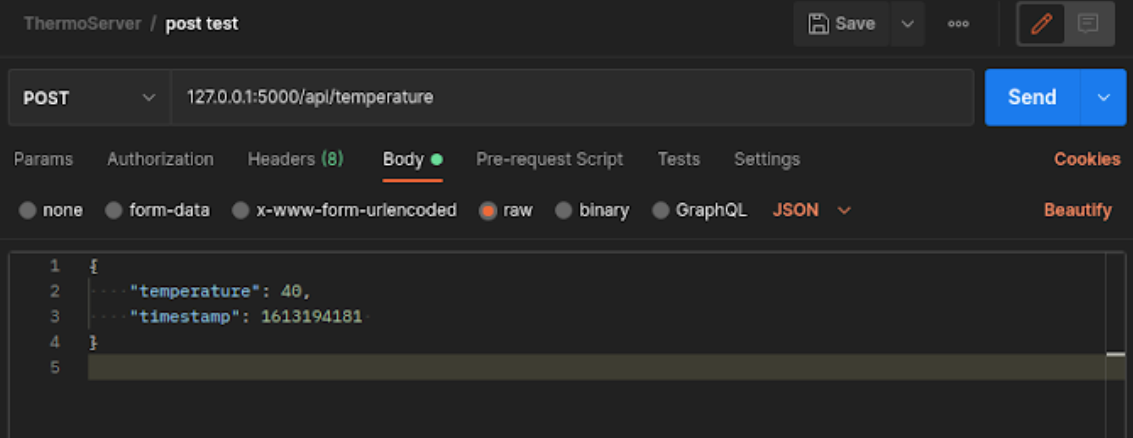
I’ve found that the easiest way to test out a new API is through Postman, which is an application that allows you to configure and send requests to a specified address. Once we have Postman installed, we’ll need to create a new request, set it to POST and enter the URL for our endpoint: 127.0.0.1:5000/api/temperature.
Next, go to ‘Body’, select ‘raw’ and enter values for the keys temperature and timestamp in a JSON format. You can take a look at how I did this in the image below if you’re not familiar with how to do this. The values don’t really matter because we’re just testing this out for now. Finally, click the ‘Send’ button and you should see a successful response.

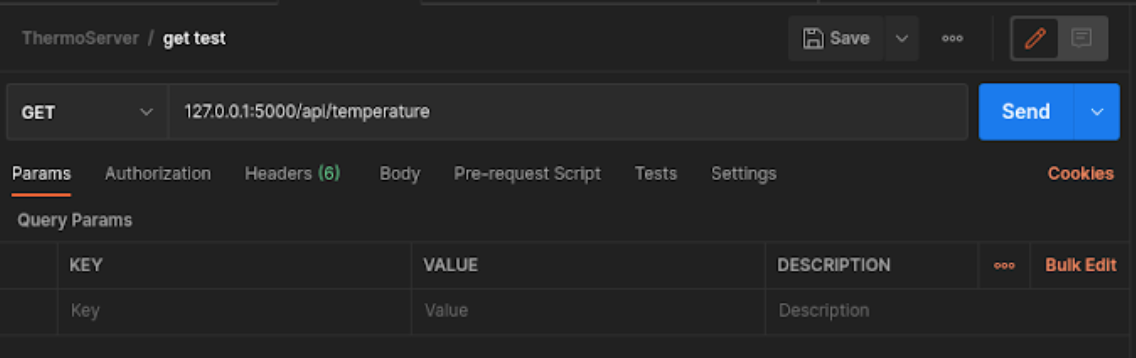
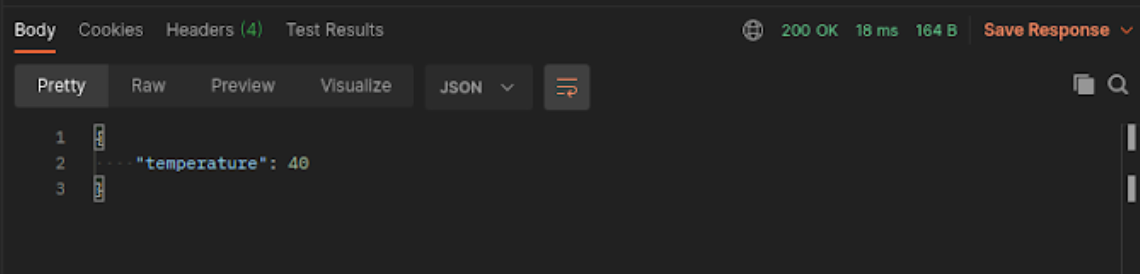
We could now open some MongoDB interface and check if the data was recorded correctly, but to make this a bit quicker, we can just run a simple GET query on the same endpoint and see if we get the expected data back. To do this, we’ll create a new request again and this time set it to GET and enter the same URL. We don’t need to do anything else this time, so we can just send the request off and wait for the response. Once again, we should see a successful response with the temperature that we specified earlier in a JSON format. As another test, we could run the query again with a different temperature value and more recent timestamp, just to ensure that our sorting is correct, but I’ll leave that up to you to try out.
Now that we have a server ready to receive data, we’ll move on to building our simple IoT circuit.
Building an IoT circuit
Building the circuit requires a tiny bit of electronics knowledge, but it’s simple enough to follow along if you have the correct components. Here are the steps I followed:
- First, I placed my ESP8266 on the breadboard, and connected the 3V3 pin to the positive side channel, which is usually marked with the plus sign, and the GND pin to the negative side channel, which is usually marked with a minus sign.
- Next, I placed the DS18B20 temperature sensor with the flat side towards me and connected the right leg directly to the positive side channel with a jumper wire. The middle leg is connected to the D2 pin via a jumper cable, and to the positive channel via a 4.7K Ohm resistor. The left leg is connected to the negative side channel.
- I then placed each LED in the board with the flat edge of the outer casing towards the left, and with a bit of space between them. For each LED, I ran a jumper from a pin – D7 for green, D6 for yellow and D5 for red – to a spot in line with the right leg of the LED.
- Then, I ran a 100 Ohm resistor between that spot and the right leg of the LED.
- Finally, for each LED, I ran a jumper from the left leg to the negative side channel.
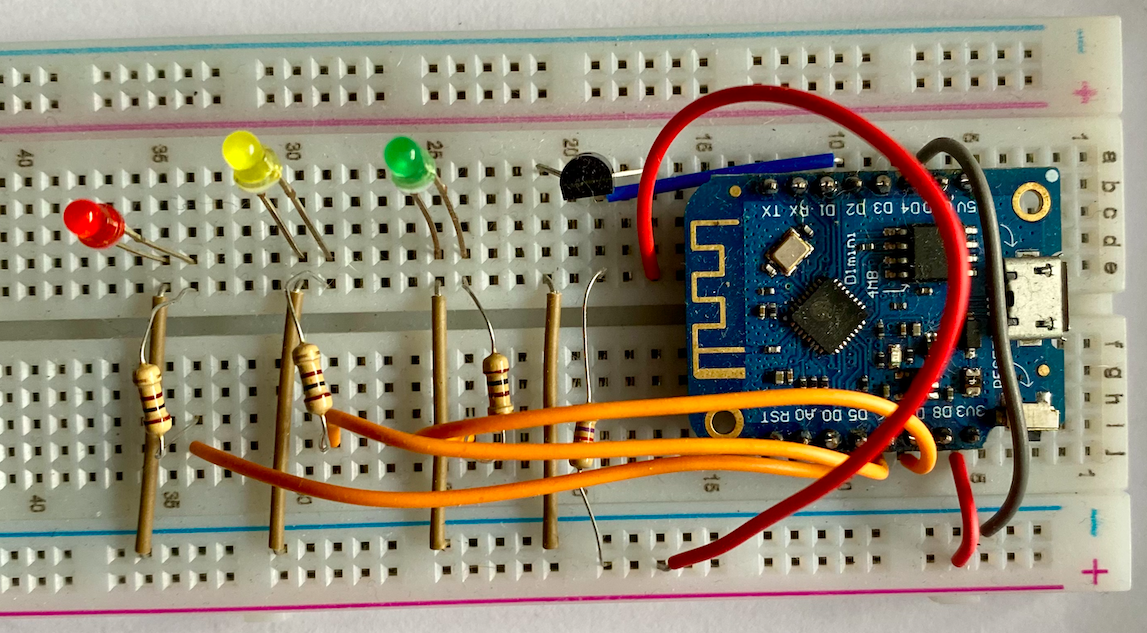
Once you’ve done all of this, the circuit should now be complete, and we can get to flashing the microcontroller and writing some MicroPython code!
Writing MicroPython code
Step 1: Setting up the IDE
When dealing with MicroPython, I found that using the right IDE made it a lot easier. In my case, I chose to use Thonny, a cross platform Python IDE that makes flashing the MicroPython firmware and running your own code easy. You can download Thonny from the project’s website here. You’ll also need to download the latest MicroPython firmware for ESP8266 here.
- Now, we’ll connect the ESP8266 via USB cable and launch Thonny.
- In the toolbar, select Tools > Options, and select the ‘Interpreter’ tab in the window that pops up.
- First, select ‘MicroPython (ESP8266)’ as the interpreter that should be used and then select the appropriate USB port.
- After this, click ‘Install or update firmware’ in the bottom right of the panel.
- Again, select the USB port and browse to the downloaded firmware.
- Select ‘Dual I/O’ (dio) as the flash mode and check the option to erase the flash before installing.
- Finally, click ‘Install’ and wait for the flashing process to complete.
If successful, the ‘Shell’ tab – which should be visible at the bottom of the main Thonny window by default – should state the MicroPython version and a command prompt. Typing help() should print the MicroPython welcome help dialogue. We should now be ready to start writing some code for the ESP8266!
Step 2: Writing code for the ESP8266
Start by importing the necessary libraries and setting up some configuration variables, including your network credentials. Of course, this information should never be added to source control, and it may be better to store this in a separate file that is uploaded to the ESP8266. However, to keep things as simple as possible, I decided to keep everything in one script.
Note: It’s also important to note that the ESP8266 platform is not secure, so there is an inherent risk in storing confidential information, such as your WiFi password. There is no option to encrypt the flash storage, so your code and files will be available as plaintext if anyone is able to connect a computer via the USB port. Given that my circuit wasn’t going to be left in an insecure location, I wasn’t too worried about this, but your mileage may vary.
Next, set up the LED pins as outputs and define some helper functions for working with them. Following this, set up the temperature sensor by scanning for devices on the specified pin. Entering the main loop, start by trying to connect to the network with the previously defined credentials. If successful, we can move on to the temperature recording loop.
Here, we can check if enough time has passed since the last temperature reading was recorded based on the configured time between recordings. If not, the system will sleep for the remainder of the time. Otherwise, we can take a temperature reading and send a POST request to our backend API. If successful, we can reset the time until the next recording. We then go back to the start of the temperature recording loop. If, at any time during the main loop, we encounter an exception, we’ll catch this and restart the main loop. During all of the above, I triggered the LEDs to flash at appropriate times to make it easier to tell the different things that might be going on.
import machine, onewire, ds18x20, time, network
import urequests as requests
import json
import math

# Configuration
SERVER_IP_ADDRESS = ""
SERVER_PORT = ""
NETWORK_SSID = ""
NETWORK_PASSWORD = ""
SECS_BETWEEN_READINGS = 300

# LED Setup and helpers
green_led_pin = machine.Pin(13, machine.Pin.OUT)
yellow_led_pin = machine.Pin(12, machine.Pin.OUT)
red_led_pin = machine.Pin(14, machine.Pin.OUT)

def flash_pin(pin, n_flashes, length_of_flash=0.5, delay_between_flashes=0.5):
	for i in range(n_flashes):
        	pin(1)
        	time.sleep(length_of_flash)
        	pin(0)
`time.sleep(delay_between_flashes)`
def reset_led_pins():
	green_led_pin(0)
	yellow_led_pin(0)
	red_led_pin(0)

reset_led_pins()

# Temperature sensor setup
print("Scanning for a temperature sensor...")
ds_pin = machine.Pin(4)
ds_sensor = ds18x20.DS18X20(onewire.OneWire(ds_pin))
roms_found = 0
while roms_found < 1:
	roms = ds_sensor.scan()
	roms_found = len(roms)
	print("Found", roms_found, "temperature sensor(s)")
print("Done scanning!\n")

# Enter main loop
# Always start first recording without a delay
last_successful_recording = -SECS_BETWEEN_READINGS

while True:
	try:
    	yellow_led_pin(1)
    	print("Trying to connect to network")
    	station = network.WLAN(network.STA_IF)
    	station.active(True)
    	station.connect(NETWORK_SSID, NETWORK_PASSWORD)

    	while not station.isconnected():
        	print("Not connected yet...")
        	time.sleep(0.5)
        	pass

    	print("Connection to network successful!\n")
    	yellow_led_pin(0)
    	flash_pin(green_led_pin, 2, 0.5, 0.5)

    	# Server configuration
    	temp_server_url = "http://" + SERVER_IP_ADDRESS + ":" + SERVER_PORT + "/api/temperature"
`# Temperature read loop`
    	print("Entering temperature read loop...")
    	while True:
        	if (time.time() - last_successful_recording) < SECS_BETWEEN_READINGS:
            	print("Sleeping until next reading time...")
            	time.sleep(SECS_BETWEEN_READINGS - (time.time()-last_successful_recording))
        	else:
            	ds_sensor.convert_temp()
            	time.sleep(0.75)
            	yellow_led_pin(1)
            	temp = ds_sensor.read_temp(roms[0])
            	current_time = time.time()
            	print("Sensor reading: ", temp, sep="")


            	data = json.dumps({
                	"temperature": temp,
                	"timestamp": current_time
            	})
            	print("Sending POST request with payload:", data)


            	response = requests.post(
                	temp_server_url,
                	headers={
                    	"Content-Type": "application/json"
                	},
                	data=data
            	)
            	response.close()
            	yellow_led_pin(0)


            	print("Received status code:", response.status_code)
            	if response.status_code == 200:
                	last_successful_recording = time.time()
                	flash_pin(green_led_pin, 1, 1, 0)
            	else:
                	flash_pin(red_led_pin, 1, 1, 0)

	except Exception as e:
    	print("Exception caught:", repr(e))
    	green_led_pin(0)
    	yellow_led_pin(0)
    	flash_pin(red_led_pin, 5, 0.1, 0.1)
    	print("Resetting...\n")
Step 3: Testing the MicroPython code
If we now ensure our server is running – run docker-compose up if it’s not – and run the MicroPython code on the microcontroller, we should see some LEDs flashing depending on the status of connecting to the network and success/failure in sending the POST request. To run the script, click ‘Run’ in the top bar, followed by ‘Run current script’. If set up was done correctly, Thonny will prompt you as to whether it should run the script locally or on the MicroPython device. At this prompt, select ‘MicroPython’ and the program should proceed to execute on the ESP8266 device. In the shell at the bottom of the Thonny window, you should see any printed output from the script.
Assuming that the server and network configurations are correct, and that the circuit has been correctly built, we should now have new data in our MongoDB temperatures collection. If we run a GET request in Postman again, we should see that a new temperature value is returned.
Registering a Telegram bot
The next step to make what we’ve done available via Telegram is to set up a Telegram bot.
To register a Telegram bot, you’ll first need to make sure you’re registered for a Telegram account. Next, you’ll want to send a message to the BotFather – a bot designed by Telegram to help you create more bots. Its username is simply “botfather”. You’ll want to send the /newbot command and follow the steps to register your new bot. At the end of the process, BotFather should provide you with a token that you can use to interact with the bot through the bot API. For more detailed documentation of this process, check out the Telegram bots page here.
When you’ve got your bot token, add it to a .env file in the root of the project, in the format:
THERMOBOT_TELEGRAM_TOKEN=<your-bot-token-here>
Getting your system to interact with the Telegram bot API
To interact with the Telegram bot API, we’ll use a library called python-telegram-bot. We’ll also use the requests library to interact with the database server. We’ll add these dependencies to the requirements.txt file.
The python-telegram-bot library makes setting up a Telegram bot very simple. The most important concepts that we’ll focus on are updaters, dispatchers and handlers. Updaters accept a bot API token when constructed and use this to poll the Telegram servers for any new messages sent to the corresponding bot. An updater contains a dispatcher, which determines how updates are processed, depending on the handlers that have been registered with it. For my project, I created an updater with a corresponding dispatcher and registered a single handler that would allow my bot to respond to a /temperature command.
#!/usr/bin/env python

import os
import requests

from telegram import Update
from telegram.ext import Updater, CommandHandler, CallbackContext

def temperature_command(update: Update, context: CallbackContext) -> None:
	"""Request temperature update from API and forward it to the user."""
	response = requests.get("http://backend:5000/api/temperature")
	update.message.reply_text(response.json()["temperature"])

def main():
	"""Start thermobot telegram server."""
`# Create an updater for the bot`
	# It looks for the bot's token as an environment variable
	updater = Updater(os.getenv("THERMOBOT_TELEGRAM_TOKEN"))

	# Get the dispatcher with which handlers can be registered
	dispatcher = updater.dispatcher

	# Add the /temperature command handler
	# When the user sends a message '/temperature' to the bot, it will trigger this handler
	dispatcher.add_handler(CommandHandler("temperature", temperature_command))

	# Start polling and run until receipt of a termination signal.
	updater.start_polling()
	updater.idle()

if __name__ == '__main__':
	main()
I also dockerised the Telegram poller with the Dockerfile below. It’s very simple and similar to the one we defined for the backend server earlier, but without unnecessarily exposing a port and running a different command on launch. We’ll also need to update our docker-compose.yml file with a new service.
FROM python:3.9.1

COPY ./thermobot/ /thermobot/

RUN pip install -r /thermobot/requirements.txt

CMD [ "python", "/thermobot/telegram_server/main.py" ]
---

---
 telegram:
    container_name: thermobot-telegram-poller
    restart: always
    env_file:
      - .env
    build:
      context: .
      dockerfile: Dockerfile.telegram
    links:
      - backend
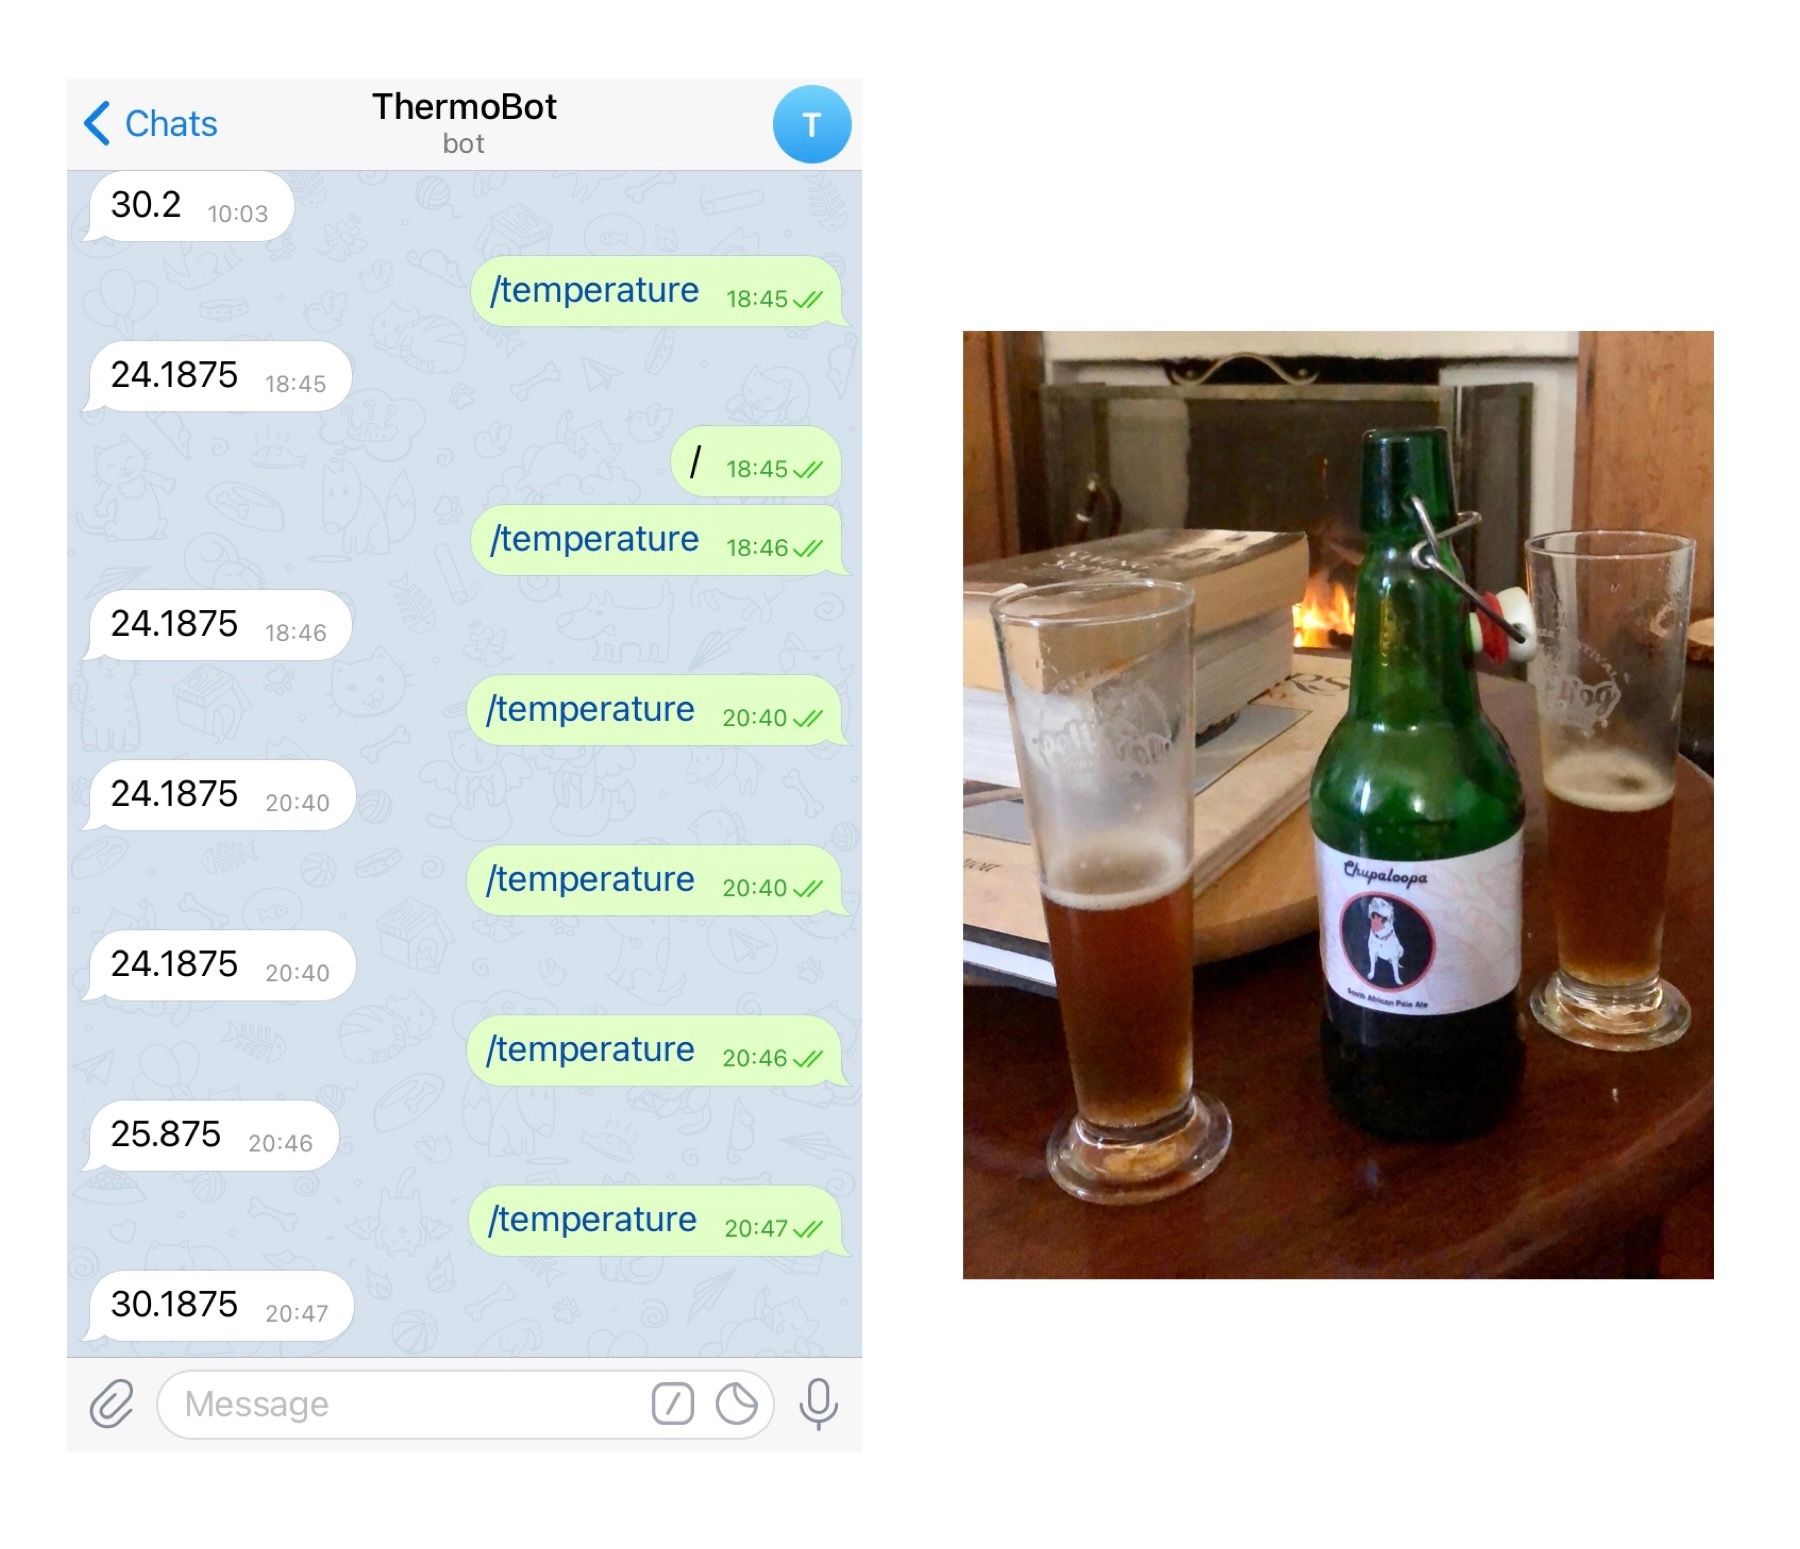
Now, we’ll run docker-compose up again, and once everything is started up, we should be able to send a Telegram message to the bot we created with command /temperature and receive the latest temperature result in our MongoDB temperatures collection. Success!
This was a really simple introduction to all the topics covered, but hopefully it’s enough to spark some ideas about what else is possible with IoT, Telegram bots, Docker, and so on.
The next step for me would be to deploy the server code to a Raspberry Pi, and introduce a frontend interface that renders the temperature history as a graph. I also want to replace the temperature sensor with a waterproof probe version that can be sterilised and put inside the fermentation tank to more accurately measure the temperature of the liquid itself, rather than just the ambient room temperature. I’ve made all the code publicly available on my github here.
Michael White graduated with his Honours in Computer Science from UCT, and spent some time working as a machine learning engineer in drone automation before moving into a software development position in the cloud technology space. He has many hobbies outside of work, including 3D printing, listening to podcasts, gaming and playing with his dog, Evey.