Building a home automation system can seem complex and daunting, but it enables you to create personalised automations and streamline your system on one device. I used web development architecture to design my home automation system. Here’s how I did that.
Why I built my home automation system using Home Assistant
I’ve always been interested in automation; home automation is no exception. About four years ago, I started poking around and bought a few smart devices: some lights, a smart plug and a few other devices. It all started well, but later I realised I had way less control than I wanted.
Every device had its own application that I had to use, and it was impossible to get them to interact with one another. That meant being vendor-locked to a specific manufacturer and at the mercy of them someday turning off their servers. I also got that weird yucky feeling when my data was sent off to an unknown server, living who knows where.
So I started looking around and found an open-source solution called Home Assistant. It’s a home automation hub with a strong focus on local control and privacy. It provides you with much more control than other home automation solutions, like an Alexa, for example, and it doesn’t tie you into one manufacturer’s ecosystem.
Home Assistant has a great UI and various integrations for existing devices on the market, which means you don’t have to build the system completely from scratch. Instead, with some YAML knowledge and reading the documentation, you can set your system up with an on-premise connection and control multiple devices via various custom and complex automations.
Home Assistant provides a convenient and easy integration for various devices from a whole list of vendors. By integrating multiple devices, you only need one web application to control your home, and you can get rid of the folder full of proprietary applications on your phone.
Finding Home Assistant was such a treat to me; it seemed like the perfect match for what I wanted to achieve! The fact that the software was in Python was a bonus since I have an extensive Python background.
Why I chose Home Assistant over alternative solutions
Now, of course, you don’t have to use Home Assistant, and I have looked at the various other open-source alternatives, such as openHAB, Domoticz, and even Google Home. I still ended up at Home Assistant, as I could not find a decent replacement for my needs.
It has a large community who have likely had your issues before. It’s written in Python and has a great UI and phenomenal documentation. The last point makes it easy to use for people who are not as technically inclined, which my 65-year-old dad can attest to.
Home Assistant even comes with its own native application, which you can use to send metrics from your phone to your home. Tired of looking for the remote when your phone starts ringing? Well, you can just have your home pause your 33rd rewatch of The Office while you're on the phone!
Home Assistant is lightweight and has its own Docker images. It even has its own OS built on Raspbian, so you only need to throw it on a Raspberry Pi, do a small amount of setup, and you're on your way! The best part is that it is self-hosted, so you’re not sending any of your information to a company.
The limitations of Home Assistant
I’ve been using Home Assistant for nearly four years now, but I’ve also been a web developer for longer. I’ve run into a few walls and pitfalls when designing and coordinating my smart home, and I’ve realised that I can apply web application design strategies to my smart home system.
Some of the pitfalls and walls have been:
- Keeping track of device automations and deciding where the logic for the automations should live
- Overcomplicating my smart home system design
- Wasting time trying to implement existing solutions
Approaching my Smart Home like a modern-day web app allowed me to solve these problems fairly quickly, as it draws clear lines between the various components in the system:
- Having the idea of a dedicated “front end” in mind makes it clear that your users don't want to think about logic and automations, which leads to a very clean interface design.
- Using the idea of external microservices means that you can quickly and easily expand your system with existing and well-implemented services
- Moving all your logic and data handling onto your Home Assistant “back end” keeps everything concise and maintainable
Why you should structure your smart home system like a web application
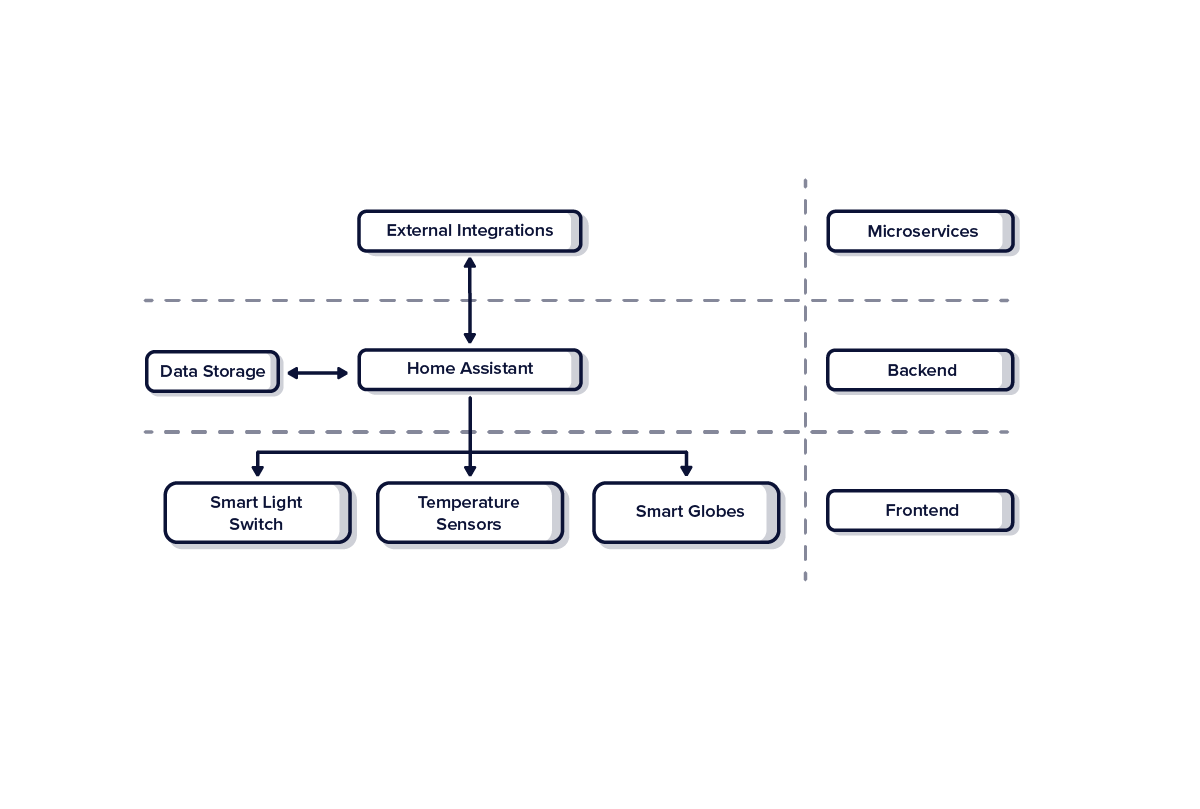
Breaking down your smart home system into a front end, a back end and a list of external microservices help to avoid these simple problems. It also keeps your system stable, scalable, and, most importantly, free of bugs.
Here Home Assistant is the back end of your home automation setup. It provides the control logic and communication for all your devices and services.
Home Assistant also acts as your data storage. The microservices are the data collection you add to expand your system. Just as a web app uses external services to get things like exchange rates or usage data, your smart home system uses this for things like weather data or even the position of the sun!
And then, finally, the front end is all of your devices that people interact with: switches, lights and sirens.
Let’s start by taking a look at the back end.
Create a dedicated back end to simplify your home automation system
The server is the brains of your smart home system. It’s useful to think about it this way: This is the part of your home automation that collects all your data and makes decisions and automations based on it.
Previously I had decisions and logic on my end devices, but this led to unintuitive and difficult interactions for my guests. I also struggled with devices doing things independently, as I had placed logic on these devices. This led to these devices being isolated from other devices and logic, which made for strange behaviour.
Once I applied the idea of a dedicated “back end”, this was all apparent. Moving the logic to what I would consider the correct place was a simple but valuable fix.
Home Assistant reads and stores the data fed to it from both your “front end” devices and the external services you integrate with. It then uses that data to make decisions based on criteria you’ve set and communicates that to your devices.
These criteria and decisions are known as automations. You can create these entirely from scratch or use Home Assistant’s existing and well-documented automation blueprints.
I used the blueprints for simple and reusable automations, like turning off a light after no movement had been seen for 10 minutes. For things that are a bit more complicated and hairy, I wrote my own automations. You can, of course, do all the automations yourself if you want to.
While you can run Home Assistant on either your PC or an external cloud service, running it on a dedicated local device is highly recommended. This ensures optimal connectivity without the internet or needing to keep your PC running at all times.
Home Assistant has a dedicated Operating System previously known as HASS, but now it goes by Home Assistant OS. They supply a whole range of images for a large number of devices and Docker images.
Here’s how I set up my “back end” using a Raspberry Pi 4, an SD card reader and the Home Assistant OS.
- First I cleaned the SD card via the SD card reader
- Then I used the Balena Etcher Software to flash the operating system onto the SD card.
- After returning the SD card to the Raspberry Pi, I followed the instructions to get it all up and running
The setup is fairly simple. After a few messy attempts at my smart home setup, I restarted it with the vision that the home assistant server would be my back end for my real-life “web app”.
The structured setup and control made the process easy because all the logic, data and decisions were in one place. This made it so that I could easily change things, find problems and fix them.
Doing things this way meant there was also less logic on the end devices, which meant that my wife would no longer have to worry about the kitchen light turning off in the middle of her baking cookies. I would recommend the same setup to anyone else.
Home Assistant provides a quick and easy way to create backups before an update or on the fly. These backups are a pretty good idea, especially if you’re going to do anything unconventional. You wouldn't want to do your complicated automations from scratch if your SD card stops working.
Now that we’ve covered your back end, let's look at the front end!
Create a front end that suits your family’s needs
The front end is made up of the devices that people in the house interact with. They’re also the devices that your back end controls.
Many people view their smart home system as a locked-down control system. While it is a control system, it shouldn’t hamper or lock you in. Creating this separation between your back end and front end makes your system easier to understand and maintain. If you’re struggling with a switch thar isn’t working, you should be able to rip that switch out and add another one from a different vendor.
You shouldn’t be limited by the devices you can add to your home based on your existing devices. The separation between back end and front end means that the control of your devices lives with Home Assistant. Not only can you use devices from different vendors without too much hassle, but Home Assistant also keeps track of your devices, making it obvious when a specific device or switch is acting up.
When setting up your front end, you would only need to do a small amount of setup in Home Assistant. Here’s how I set up my front end:
- Choose a device you want to implement or a problem you need to solve.
- Look up the support in Home Assistant for that device. Many times, someone has found a better device at a lower price point or with more features.
- Connect the device to your network via WiFi, ZWave, Zigbee, etc.
- Add the device via the Home Assistant setup.
The devices you pick affect your level of control
I’m quite a big fan of the Sonoff devices and their design, but I like having a better sense of control, so I highly recommend checking out Tasmota, an alternative open-source framework for ESP8266 and ESP32 devices (which are all Sonoff and other smart home devices). You can flash these devices with the custom firmware, which gives you a lot of control and even opens up some GPIO pins if that is something you like to dabble in.
It’s a good idea to always have a physical switch for the things that you want to do. For example, having smart light switches that can also just function as a normal light switches. You don't want to be stuck in the dark when you’re busy doing Home Assistant maintenance or when your WiFi is down.
Believe me, the SAF (Spouse Approval Factor) on that one is pretty low. Devices like these can also give you more granular control. For example, a normal click on your bed lamp turns it on or off, but a quick toggle on the lamp might toggle the overhead lights. From my experience, this has a very high SAF.
Not being dependent on an app to run your whole house and having backup control is a really good idea. The additional features and automations you can do with these devices are just a bonus.
Use external service integrations to expand your system’s fucntionality
Rounding up to the microservices I mentioned previously, you can expand inputs and automations even further by integrating them with external services.
This is the biggest benefit that you can get from an open-source build system like Home Assistant. Classic smart home device vendors rarely, if ever, give you the option to integrate with any other systems, as they want to lock you down to their ecosystem.
External services I’ve used to expand my automations
Decide on an automation you want to do first, then choose how to implement it. This forces you to think of a solution and start building your automation around that solution.
I often had a device I wanted to do something cool with, but just adding nonsensical automation doesn’t make your home feel smart. Once you have a list of decent automations, you can expand those with external services. For example, integrating with a weather app means instead of turning the lights on at 6pm, you can check the position of the sun to decide when to turn on the lights. Or, if it’s really cloudy and dark, then the lights should turn on.
Another great example is Werner Pieterson, who wrote a fantastic integration with EskomSePush, where your home is notified about the load shedding schedule and when the next stage begins. You can use this to notify everyone in the home before load shedding starts or safely turn off devices when you’re not at home.
Using integrations from IFTTT, you can integrate with Uber to flash your lights when your Uber is close.
Home Assistant has a great integration with Forecast Solar, which I’ve helped set up at my parents’ home. This service tells you the optimal time for your solar installation based on location, weather data and the angle of your solar panels.
Using this data, you can find the optimal time to charge your batteries whilst also ensuring that any unnecessary devices are turned off during that period. This makes sure that you have the optimal charge for your batteries. You can also integrate with your inverter and backup power and switch between solar and batteries depending on the sun's position. If you have a Voltronic, Axpert or Kodak inverter, you can find the integration here.
Home Assistant has excellent documentation if you want to track your energy usage, whether from your prepaid meter, or by placing clamps on your supply wires. Especially living in a country where the power grid is so fickle and the cost of electricity is increasing, making sure that you aren’t using more power than you've bargained for is a great tool. Here is a great demo of what you can do.
Honestly, the community is so big, and there are endless amounts of cool automations that you can do with these integrations. Start identifying problems or improvements you can make, and start looking around. Someone has most likely at least solved something similar, and you can begin building your automations from there.
My only other tip would be to maintain and build your smart home system as easily as possible. Like all good code, you should document your stuff, specifically your automations and device setup. You don’t want the mood light in the bedroom to be stuck on green for a whole weekend while trying to figure out where you built that automation again. SAF is very low on that, believe me!
I’ve mostly used inline comments and the supplied fields in Home Assistant, but I have read that others recommend using something like OneNote to keep everything documented and concise.
Using the system architecture of generic web applications has helped me break down a fairly complex problem: my smart home. It made the system easier to set up, maintain, and debug. Having these clear separations of the different parts helped my brain solve them a lot quicker and more effectively.
Related Resources:
Ruan Heyns is a full stack developer at Utilifeed AB in Sweden. Whilst he has a love for modern day web applications, his background as a Computer Engineer does lead him back to embedded software and hardware from time to time. He has a great love for good code, and automating as much of his day as possible!