With code changing so often, and people also in flux, it can be very difficult to keep up with what your system is doing. While there are so many great practices for improving our code and structure, we seldom put effort into how our applications and infrastructure are explained and understood. I’ve found that automation can make it easier and smoother for a team to contribute to its applications. Here's how I built a tool to help my team track how our system works, and avoid the problems that come with a growing application.

Whether it’s using the best tool for the job or separating the concerns involved in decoupling things, building a system using different languages and/or using microservices is immensely empowering. However, this approach can quickly become complicated, and many times has made me think: “This was way easier when it was just a big Rails app!”
In my experience with the above, I often found myself and my peers constantly changing between directories, for example, or trying to remember the command to run tests. And, as our uncertainties increased, inconsistencies starting creeping in. The problem here was that we were not thinking about team sustainability: Every time something changed (a library, API service, or a team member), getting back on track was more complicated than it needed to be.
It was while working on a project written in Elixir and Javascript that I realised we needed to do something about this: We had about a dozen open source NPM modules that we had to maintain, which was crazy because small things required hero effort. When trying to hunt down a bug, for example, I felt like I had to get the stars to align, tap my heels, and dance around a fire to get everything in the right state.
Initially, I set out to make a bunch of shell scripts, to help me check out dependencies and align said stars. That helped in the short term: The process of working bakes things into memory, and then you “just know.”
But then I thought: It’s not useful that only I have a secret weapon - what about everyone else? An application that is hard to work with is not only expensive from a business point of view, but it’s also frustrating and can really limit refactoring efforts. This becomes tragically clear when someone new joins - or worse, someone leaves. All of a sudden, all those little things about how to work with your application(s) need to be rediscovered or taught.
After a while, I decided to build a tool to help codify the knowledge in the team, which is an idea informed by the concept of shared knowledge. Simply put, sharing knowledge is critical to increasing the value you add to the team. We all work hard (and sometimes long) hours, and if you are able to train consistently and support people, even in your absence, the value you contribute increases exponentially.
By gathering everyone’s input, we were able to produce a tool which helped smooth-out our processes and issues, while allowing us all to be more productive and confident in our work.
Here are the steps I’d recommend you use to start building an in-house tool that helps you bring your team’s knowledge together.
Step 1: Figure out the problems you’re actually experiencing
First thing you need to do is gather information about where your silos and problems are. A silo usually involves a person who often works on certain aspects of a system in isolation.
Something like “This looks like a Fiona thing, let her tackle that one!” is often a precursor to this sort of situation, and it becomes a problem when Fiona is the only person who knows how that part of the application works.
When you have silos, your ability to make decisions is limited by your time and understanding. This can lead to tricking yourself that a satisfactory solution is an optimal one.
In my experience, setting up a meeting (or at least a place where everyone can share their pain points) is a good place to start. Here, you can encourage the team to describe things that scare the wits out of them, make no sense, or even are just plain annoying.
Just like a retrospective, discussing these pain points allows the team validate things that do work, but also to make observations on the past in order to create opportunities for the future. Focus on the facts, keep things positive, and write-up a list of things that you can address as a team.
Step 2: Decide on what to solve
The next step is discussing the list of things you gathered, and coming up with possible solutions. However, you only want to pick a few things: Not only are there often an overwhelming number of problems you could solve, but only a few have a clear path to implementation. You also have to decide which of those will have a big enough impact to justify doing them.
To help choosing which things to do, there are two methods I tend to follow:
The first one is to look for emotional cues to problems we’ve listed. You and your team are both stakeholders and engineers; just like building a spec for a new project, you need to pay attention to what matters to the client - and this time it’s your team! Problems that provoke an emotional response in your team - be it anger, or frustration, or even reservation - are a good sign those are the ones you want to sort out first. If an emotion is a blocker to solving a problem, it’s a great sign that those problems should be zoomed-in on first.
The second method is to use a quadrant graph that plots each item’s value to the team, and the effort required to do it. These kinds of charts are super easy to understand, and really make the whole process of deciding what to do much clearer. It could be something as simple as this:
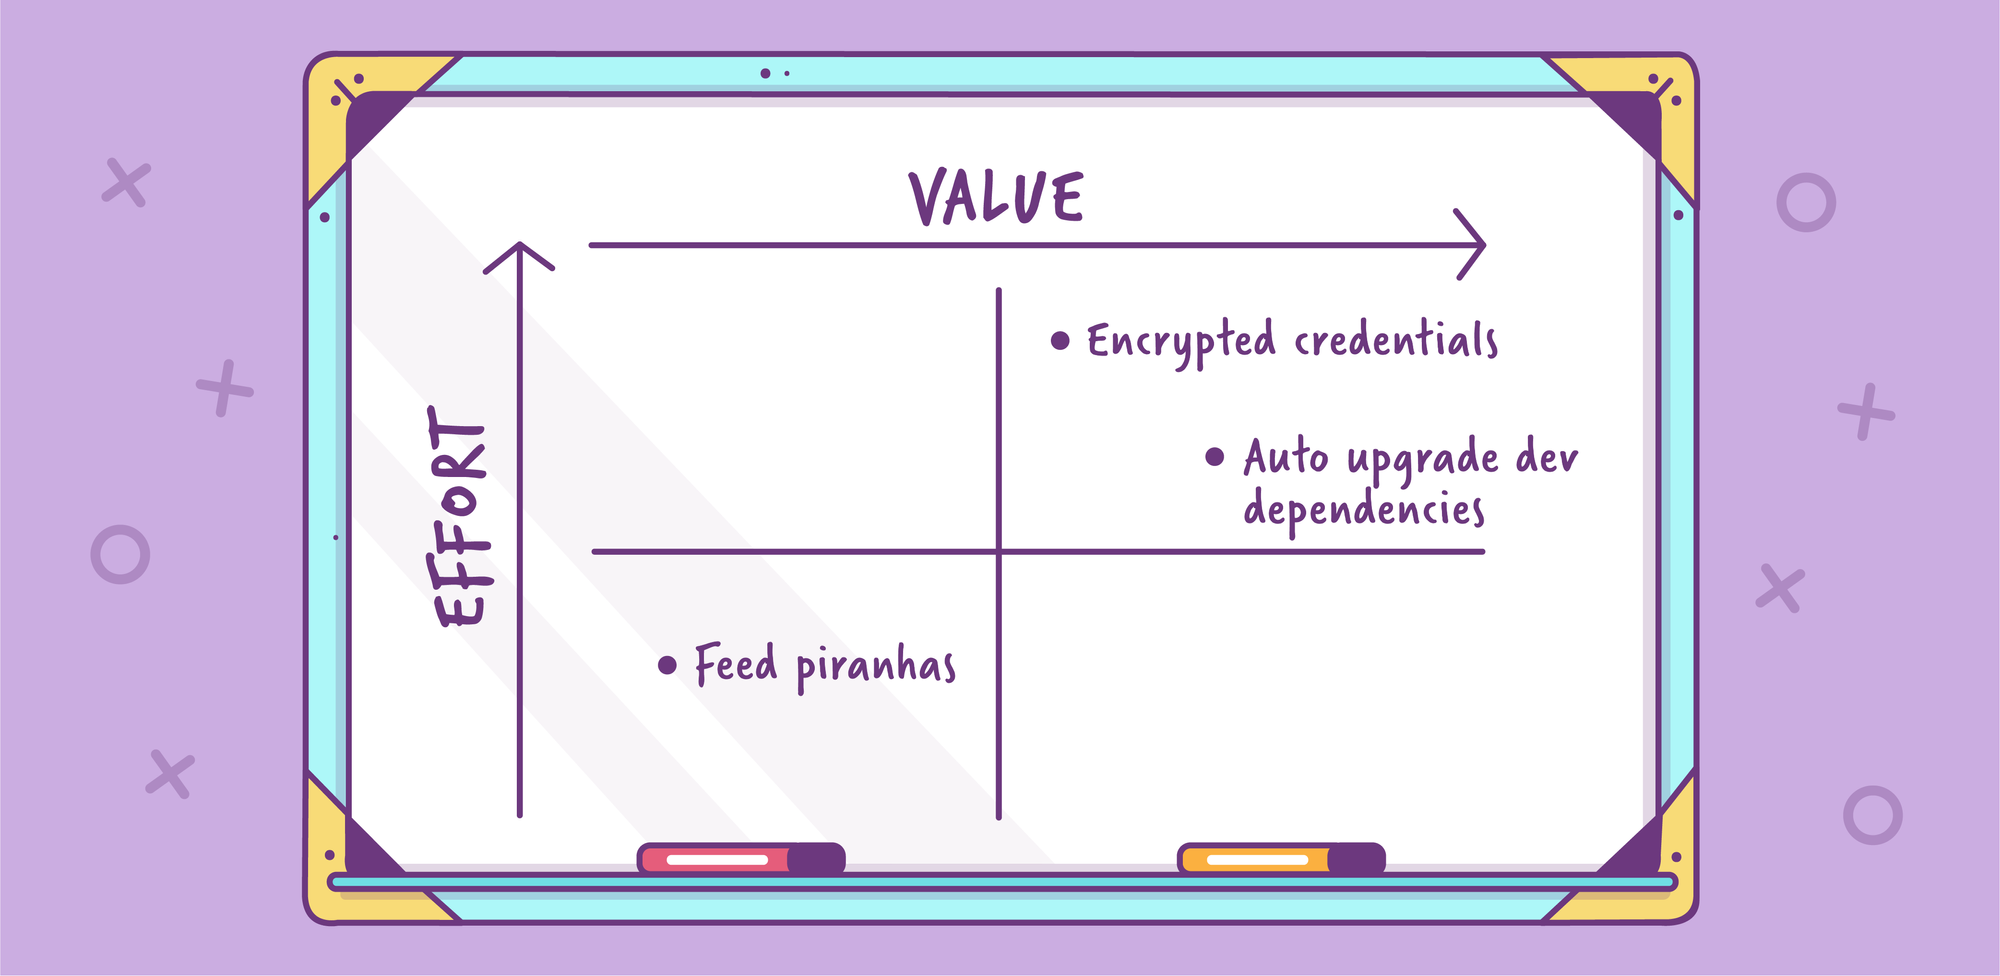
(Side note: A radar or spider chart can be superior to a quadrant chat, as you can plot other (positive) factors such as risk, complexity, expected life of feature, and knock-on wins. But to keep things succinct, I have opted for a quadrant graph.)
At OpenFn, for example, we had a sophisticated ETL system, which allowed customers to write data transformation expressions. At first, this was baked into the application; however, it made recreating errors and experimenting really difficult. While going through the process described above, we decided to make a CLI explicitly for this situation. The biggest win would allow us to use our text editors and run these expressions locally on the terminal, without having to be coupled to the database or customer facing interface.
What ended up happening was that the entire expression-part of the system was abstracted into a separate project - and the tool we built clearly documented how to work with it. This solved our original issue, to make experimenting and customer support much easier. It also made contributing to the project much easier for newcomers, because the tool removed the need to be aware of all the moving pieces at once.
Not everything is actually worth solving. In fact, it’s easy to enable bad practices by making them easier to do. Doing something the “wrong” way will, and should always hurt.
Step 3: Design a solution
Now onto the fun stuff! You’ve got a bunch of bite size items that you know you want to do. What next?
First, you need to choose a target platform. For example, is this going to be a web application, backend service, or mobile app?
In my team, we picked a CLI application as the easiest point to start from. CLI applications are often the easiest way to get automation work done, and many developers are comfortable and experienced using the terminal. CLI apps also are generally easy to write, maintain and deploy.
Secondly, it’s important to create applications that everyone enjoys using and is easy to contribute to. Give your tool a fun name, get the team to think of one, or try out a name generator! The most important thing is just that it’s easy to type - if everything goes according to plan, you’ll be typing it a lot!
You can now plan out the steps you need to take to solve the problems you’ve selected by defining your actions and your contexts. The action would be a verb, like “deploy” or “check”, and context refers to a subsystems’ name or a category of task (perhaps relating to a particular role).
For example, you might end up having a list like this:
- Frontend
- Deploy staging/production
- Run tests
- Current version
- Check dependencies
- Backend
- Deploy staging/production
- Get error rate
- Compare staging & production database schemas
- Feed piranhas
As you can see, it’s pretty easy to get carried away!
While trying to not inundate yourself with “things to do”, make sure you don’t forget about the other “odd jobs” that people need to do from time-to-time either. These kinds of ad-hoc tasks take up a lot more time that a lot of people realise, and they also pull you away from the thing you were doing - context-switching is super expensive!
But these jobs also form part of the workflow: Not only do they help you map out a more comprehensive idea of what it will take to solve this problem, but they also give you a realistic idea of how long it could take, and who the important stakeholders in solving this problem are.
For example:
- Sales
- Get current number of new sign ups
- Get quarterly conversion rate
- Send failed debit orders list to accounting
- Get Outstanding tickets vs. Resolved for quarter
- Synchronize stats to Google sheets
It’s important to recognise that you are building an application - planning out it’s interface and structure is essential. Just like a real product, if it is hard to use or obtuse, no one will use it.
Likewise, if it’s expensive to maintain, no one will want to pay for it!
But, before you git init, there are a few rules I like to stick to when designing your tool:
- It must be easy to use and easy to extend: If majority of your team battles to understand the tool, or feels apprehensive about opening up the code, then this is a failure on the tools part. The first and foremost objective should be that the tool is supposed to support you, and if you end up saying “Gah, I’ll just do it by hand”, that’s a sign it may not last.
- It must be verbose: I personally dislike tools that don’t tell me what they are doing.
Since a lot of these kinds of tasks run shell commands, I suggest printing the command in gray before running it, or streaming the output while the command is running so that you can spot issues before they happen. - It must be helpful: When deploying things that need a version bump, ask the user what the next version is supposed to be. Or, before doing something you can’t undo, get a confirmation of the above. This makes it more likely that what you deploy will actually be helpful to more people than just yourself!
- It should be playful: This is for your team! Put emojis, puns and coloured text output wherever you want. You want people to actually use this, and find value in using it, so make it something someone will find enjoyable to use.
- Don’t reinvent the wheel: If you already use some other deployment or automation tool, that’s totally cool. The tool should wrap those existing practices - not replace them.
Step 4: Build the solution
How the solution is built is going to be pretty specific, and you quite possibly have some automation in place already. So, I’m not going to go through how to create a CLI application - after all this is your team’s app.
What I can advise, however, is to avoid replacing existing tools. Rather, augment and wrap them. There are some amazing tools out there for automation, and if you use things like capistrano, ansible, serverless etc, there is little to gain in replacing tools like these. Not only are they all really good, they are general enough to be used together with other tools (including your own).
The interesting thing about building tools around other tools, is that while a generic tool can make tedious or complex things easier, wrapping those steps in your own tool brings context and meaning specific to your project. For example, while Ansible can do amazing things, the command itself is quite terse. By having your own tools run that command, you save other people from having to remember the exact incantation of arguments, and it becomes easier for other people to use it. It also lowers the risk of newcomers making mistakes.
Here is the general flow I follow when building tools:
- Add a README: I usually kickstart everything off with a
README.mdfile, and doodle some “mock” documentation and structure. Nothing too crazy, but it really helps in setting the stage for everything else to come. - Pick a language: This may seem super obvious, but you have to actually pick a language that suits what you need to do. I personally prefer Ruby for automating and scripting, largely because I just really like Ruby, and also the language itself was originally written to be for scripting. When Ruby doesn’t fit or I’m working with people who aren’t crazy about Ruby, I’ve found Node.js to be a fairly good middle-ground. For me, any language that makes running a shell command easy and clear is a winner. The only real criteria here is: Will it be easy enough for everyone to understand, and to contribute?
- Get a ‘Hello World’ example going: By this, I mean writing an entire task out in a single file if possible. You don’t need to commit to any structure right now; focus on how you interact with the task. In my situation, I like to play around with all the variations of a command, like flags and what the
--helpargument would look like. If you haven’t written a command line application before, fear not; there are lots of resources available, like this one or this one for example. - Add a README: Ok, not trying to repeat myself... but now that I have a little bit of code, I revisit the README and make sure it has all the details about how to run the example and install the dependencies there might be.
- Add another task: Pick off something chunkier. This often can be the cue that more structure is needed. Perhaps the second task and the first one share some common functionality?
I have found this kind of practice to be very rewarding. It’s really great to see anyone and everyone in the team deploy things that would otherwise be avoided, and knowing that all the steps in a complex pipeline have been addressed.
I’ve also been amazed at how many great shell scripts have come from other developers: Things that were a pain for me, were easy for someone else, because they had automated it but never shared it (no fault of their own, there was no real opportunity for them to share it - until now!).
I hope this inspires you and your team to get together, and wrangle those things that could be slowing you down or getting in the way of doing what you need to do. If those hurdles are things you can overcome, your productivity and sanity are almost guaranteed to improve!
Resources
Tutorial on building an interactive command line with Node.js
Article on writing command line apps in Ruby
What is Rake in Ruby & How to Use it
Stuart is an experienced software developer with a passion for architecture, bug hunting and performance of web applications. Over his career, he has developed skills in systems integration, scaling, automation, testing, problem solving, and project management. He is particularly fond of Ruby, Elixir, Javascript & automated testing. Despite his broad interest in many facets of successful software projects, he is an accomplished photographer to boot.