Including documentation in a developer routine can be painful. They're hard to write and require a lot of effort to keep up-to-date since the software can change a lot in a small interval of time. On the other hand, not having it at all makes it difficult to understand existing functionalities and would require time to dig into the code to understand the expected results in a specific context.
Here's how my team used Ruby on Rails libraries as part of our routine to improve API and system behaviour documentation.
The challenge of limited documentation
As a new joiner or a developer new to a project, we want to know more about the product we will work with. The easiest way to do this is by reading the documentation. But if this is missing or inadequate, then we would have to find ways that could take more time to understand the project, like asking people with more experience or looking into the existing codebase.
I faced a similar situation at a startup company where the product context was completely new for me. The code was a bit hard to understand, and the documentation was almost nonexistent. The project was written in Ruby on Rails, so I already had some experience with the code structure, but it was still a difficult task coming to grips with the code.
So I started making time with experienced people on the project to understand the code better. The problem with this is that there is always a bit of a risk when relying on people's availability in a startup environment where deadlines are tight and the "fails fast" mentality is always on.
On the other hand, spending too much time trying to understand the code is not super productive either. This made my onboarding process take a lot longer and could have been improved if there had been some high-level documentation available.
The benefits of up-to-date documentation
Through this experience, I learnt that including documentation in the development routine makes it less painful for new joiners in the long run and has a whole bunch of other great benefits, including:
- Knowledge sharing: clear and asynchronous communication means that part of the knowledge is already available, and you don't need to constantly interrogate your coworkers with more experience.
- Better onboarding experience: get quickly familiarized with processes and business rules, spending less time asking colleagues to clarify or looking for information
- Better productivity: we can easily find the information needed to complete a task without having to deep dive.
Yet the problem is that keeping documentation up-to-date or investing time to start writing one requires a lot of effort, leading to this task being left to a later stage or ignored completely. With this in mind, my team and I decided to make things easier for ourselves by:
- Looking for tools that would be easy to add to our routine, and
- Improving the way we use existing tools that allow for better documentation.
Finding the right tools
When setting out to look for tools that could help us, we needed to choose what kind of documentation we wanted to build into our routine. We decided to go with tools that would be easy to implement and use within the code instead of looking at system documentation, like requirements, architecture or maintenance documents. We did this because system documentation would require more effort and, consequently, more time to align with the Product Manager and the Technical Lead.
Once we'd decided to implement documentation tools within the code, we then had to look at the areas which would benefit the most from improved documentation and decide which tool would be most useful.
The two main problems we were trying to solve with the documentation tools were:
- API documentation to understand incoming and outgoing requests, and
- System behaviour documentation to understand the impact of new features or improvements added to the code.
The project already used the Grape API gem, which provides a simple DSL by facilitating the development of RESTful APIs. As some of the developers had some previous experience with Swagger in helping them to generate documentation, we decided to create API documentation with the grape-swagger gem.
We then decided to use the RSpec gem to improve the quality, coverage, and description of our unit tests, as it was also a tool our team was already familiar with. Using RSpec would help us have well-described scenarios and explanations for expected behaviour. This leads to better visibility of the system behaviour and an easier way to understand the business rules and the impact of future implementations without having to deep dive into the code.
How Swagger helped us to have up-to-date API documentation
Swagger is a set of open-source tools that help programmers develop, design, document, and use REST APIs built around the OpenAPI Specification. This specification is a standard language-agnostic interface to HTTP APIs.
Swagger contains more than one tool available, but we chose to use Swagger UI only. Swagger UI is used to visualize and interact with API resources. It generates a web page that documents the API generated by Swagger specification. This would work perfectly for us because everyone in the team could easily see the inputs and outputs from internal and external endpoints and try them out through the interface. Here you can check what Swagger UI looks like.
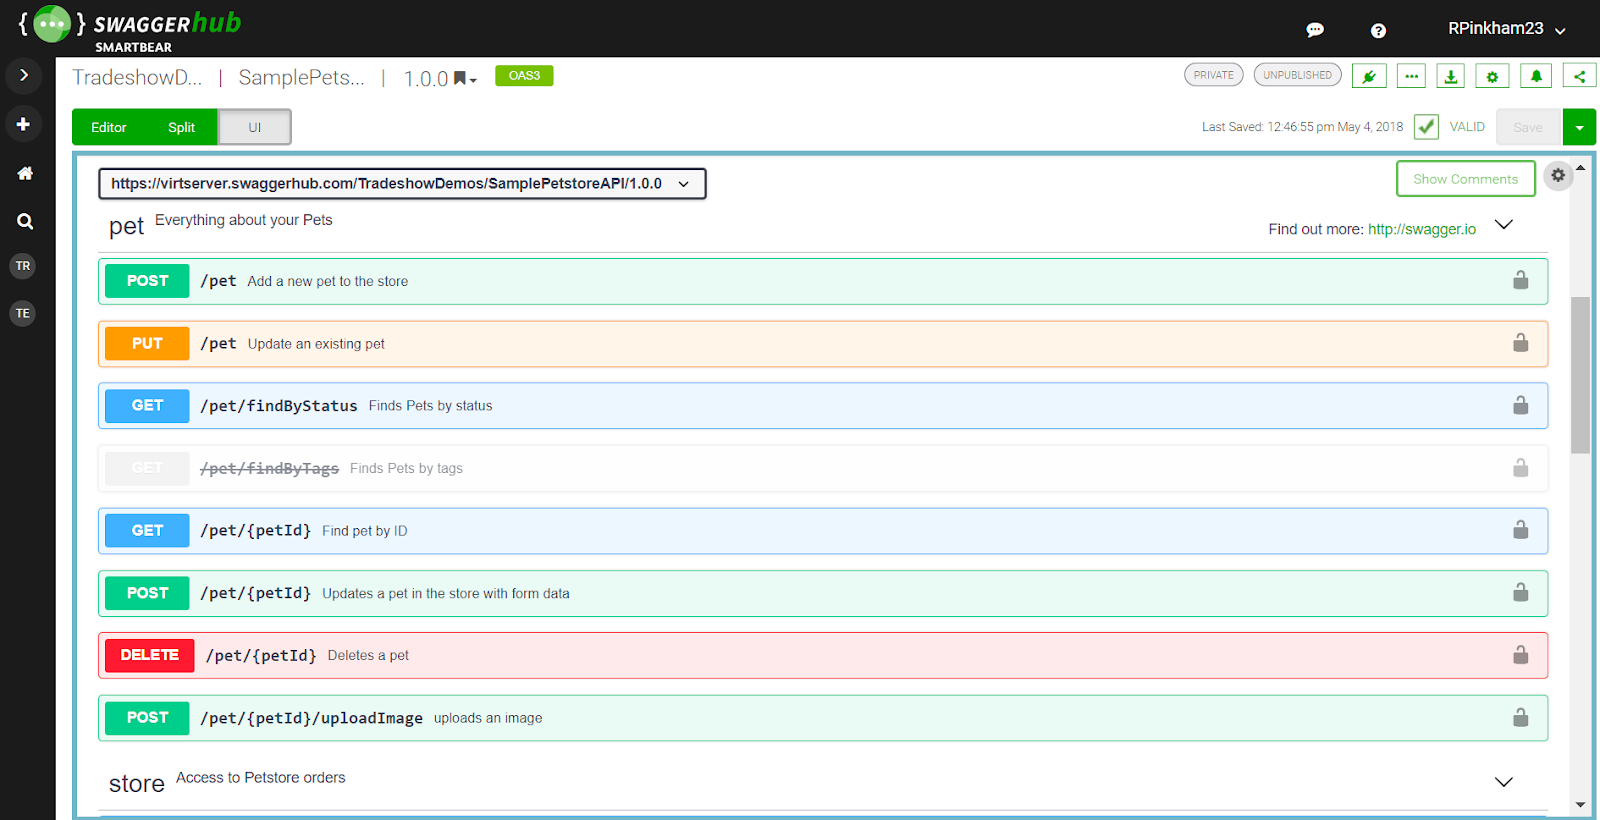
The gem we used is grape-swagger. This gem auto-generates documentation for Grape API (another gem that helped us to organize and simplify our controllers). The combination of these gems make us keep the API documentation clear and always up-to-date since the endpoint specifications are defined in the controller classes.
How to generate API documentation using grape-swagger
When implementing this tool for the first time, you will need to modify the controllers in order to generate the API documentation. After you install the gem, you then generate a swagger specification file and start to write the documentation.
Example from grape-swagger documentation:
desc 'This is an example' do
  success: [
      { code: 201, message: 'Successfully created' },
      { code: 204, message: 'Already exists' }
    ],
    failure: [
      { code: 400, message: 'Bad request' },
      { code: 404, message: 'Not found' }
    ]

end
params do
  requires :updated_reason_code, type: Integer, desc: 'Updated reason code.'
  optional :name, type: String, desc: 'Updated user name.'
  optional :email, type: String, desc: 'Updated user email.'
end
post do
  # Some logic here!
end
In the example above we can see two blocks of code defined for the POST endpoint. The desc block contains the description of the endpoint. It starts with a short text description in the beginning of the block and the codes/messages to the success or failure responses. The params block contains a list of params and their details.
The impact of adding this extra code in the controllers is to generate a JSON that serves as an input to the Swagger UI.
Since the documentation is inside the controller, each new feature or improvement that requires a new endpoint or an adjustment to an endpoint should include the 'documentation' part.
Benefits of implementing Swagger
- Endpoints become well-described, making it easier to understand the income and outcome.
- Communication between front-enders and back-enders improve since the requirements were available from the beginning of implementation.
How RSpec helped us to document system behaviour
The RSpec library is one of the most common tools for testing in Ruby on Rails because of the simplicity of the syntax. The main idea is to write tests as specifications of system behaviour.
RSpec is a DSL (Domain Specific Language) that is meant to be easy to read, making it perfect to become a part of the documentation.
In other words, the description of the scenarios and their expectations expressed in plain English will make the documentation part of the code itself. When a new joiner needs to modify some part of the system that they never looked at before, the expected behaviour of the classes or methods can be easily understood.
The gem is composed of the following parts: rspec-core, rspec-expectations, rspec-mocks and rspec-rails. These parts can be used with different testing tools like Minitest.
Below is an example where we can easily go through the code and understand the expected behaviour.
# app/models/user.rb

class User < ApplicationRecord
  validates_presence_of :name, :birthday, :email
end

# spec/models/user_spec.rb

RSpec.describe User, :type => :model do
  subject {
    described_class.new(name: "User Name",
                        birthday: Date.new(2000,2,25),
                        email: "username@test.com")
  }

  describe 'validations' do
      it "is valid with valid attributes" do
        expect(subject).to be_valid
      end

      it "is not valid without a name" do
        subject.name = nil
        expect(subject).to_not be_valid
      end

      it "is not valid without a birthday" do
        subject.birthday = nil
        expect(subject).to_not be_valid
      end

      it "is not valid without a email" do
        subject.email = nil
        expect(subject).to_not be_valid
      end
  end
end
The code snippet above describes the validations that the user model has. In the beginning, we can see the definition of the class we want to test - in this case, we are creating an instance of a User object with the expected parameters.
After defining the subject, a new block of code with the keyword describe wraps a set of tests against one functionality, in this case, the model validations. The test case itself is defined in the it block, where we can find the expectations based on changing some attributes.
Now, if a new joiner wants to go through this unit test, they can easily understand the expected behaviour as it's written in plain language.
Benefits of improving how we use RSpec
As I mentioned before, we were already using this gem in the project, so the main job was to improve the quality of the tests and the coverage. This would then give us more confidence to implement fixes or even new features that might depend on current system behaviour as we can easily identify the expectations.
Another benefit of increasing the coverage is to be aware of side effects while changing the code. If the test is well-written and is impacted due to a recent change, it will fail and give visibility to impacted business rules that were not identified in the discovery phase.
This was not a trivial task since we needed to invest some time translating the expected behaviours into the unit tests based on the current code, but once it was done, we became more confident to refactor, implement new features or even fix a bug.
Conclusion
Changing the developer routine to be more careful with the API documentation and to improve unit tests took some time. After we added the tools, we also had to implement some extra steps for us to take before merging the pull requests to ensure that everybody was following the new process of keeping the documentation up-to-date with the chosen tools.
To keep track of the API documentation, the reviewer of the pull request became the one responsible for double-checking if the expected API documentation was added or modified. For the unit tests, a new step was added in the GitHub Action workflow to ensure that the coverage does not decrease in new pull requests, and the reviewer must check if the change made includes specs with a good description.
Despite the time-consuming process of implementing these tools and the extra steps added to our workflow, we still saw a lot more benefits with having up-to-date documentation, including:
- Back-end and front-end developers' interactions became faster since the API started to become well-documented, and the success and error messages were available and described in Swagger UI.
- After some months, our tests started to catch more possible bugs before new features/improvements went to production.
- The dynamic between developers and product people got better since we collaborated more to build the scenarios.
- Our productivity improved. We could quickly check business rules/expected behaviour for features we never worked on before, and the new joiners understood the meaning behind the system functionalities.
- The onboarding experience of new joiners became more efficient and painless.