QA testing login and consent pages can be quite hard: The same two-factor authentication that keeps your customers safe also makes it challenging to write automated tests. Here's how I wrote Python tests that bypassed 2FA while also ensuring customer safety. To do this I used selenium and developed a Slackbot.
As a QA Engineer at HR and payroll software supplier NMBRS, I had to develop automated tests of our login and consent pages to figure out where the problems were within our identity service. The identity service is what our customers use to log in.
As we deal with sensitive information, the login process requires an authentication service. We use OAuth2.0, the industry-standard protocol for authorisation which is also used by Facebook, Instagram, and Whatsapp.
It was important to make sure we had good test coverage on this because, at the time, my squad didn’t have any tests implemented. However, developing the test came with two major challenges:
- OAuth2.0 runs our two-factor authentication (2FA) and sends an authentication code to an email account or a cell phone, so automating this process was a serious challenge because we couldn’t link it to an email account or cell phone. Automated tests need to be able to run without any manual inputs, so we couldn’t link it to an email account or cell phone.
- NMBRS uses shadow-rooted selenium to automate our tests, which is normally great because it hides web sections. In this specific case, shadow-rooted web components made developing tests harder, because the test then has to find those shadow-rooted elements and tell the selenium how to input text elements.
To resolve the 2FA issue, I created a Slackbot to fit with the selenium tests. I then deployed the bot in a local server, NGROK, which let the selenium tests access it via an URL endpoint. This allows me to test the system locally, which was necessary to make sure everything was as expected, before deploying it to Azure DevOps. To resolve the selenium issue, I wrote a command which you can find later on.
Here are the issues that came up in our second release and how we solved them:
The first release tested the product as a whole using aggregate testing that runs everything in a single flow, so we couldn’t find the exact position where the product was failing. For instance, if the identity service breaks, the customer can’t log in.
The second release split the whole test into unit tests. Using pytest, a Python library, we developed unit tests to figure out exactly where the identity service was breaking. The tests needed to:
- Determine if the Slackbot, which helped us to bypass the 2FA, is working or not.
- Figure out whether the web app server is available or not. This is needed because if the web app server fails, the whole system will be compromised, including the tests.
- Find out if the login page is filled correctly or not, as sometimes the UI/UX squad changes the web components to improve the application’s design or fix a bug which can break the identity service. For instance, if the text input isn’t properly linked to the username or the password, the user can’t login.
- Make sure the Slackbot receives the notification that a 2FA authentication code is needed and it retrieves a code once the notification has been received.
- Know whether the 2FA code retrieved by Slackbot is valid or not.
- Verify if all profiles on the consent page are allowed or not.
- Ensure that, after clicking the ”allow” button, a code is retrieved in the url and confirm that this code has been retrieved.
- Get the access token and the refresh token via the OAuth 2.0.
- Click to generate a new access token that must be different from the old ones.
Steps 4 to 6 above were the hard part of developing the tests and are what I cover in more detail below.
Testing approach: The Gherkin Reference
One of the limitations I had when creating these tests was that they had to follow the Gherkin Reference test structure, which is what NMBRS uses.
Gherkin is a line-oriented language. Each line starts with a keyword and is called a step. The main objective of a line-oriented language is to help the developer or QA engineer follow how the test is running through each step. In Gherkin, a scenario has one or more steps and generally has the following structure:
- Given: step where the test’s pre-condition is defined
- When: step where the action that we want to test is defined
- Then: step when the expected outcome is successful
- And: additional steps to be added to a Given/When/Then, which is used instead of repeating those words
The single keyword “Scenario” is unique and you just run it once, while the “Scenario Outline” can have several examples. In more technical words, it can work as a template.
For example:
Scenario Outline: Check Login
	Given I access environment '<Environment>' on country '<Country>'
	When On login page, I click on Sign-In Button
	And On sign-in page, I fill in user '<User>' and password '<Password>'
	Then Check if the user is in start page '/start.aspx'
The table using these variables would be:
Examples:
| Environment     | Country | User   | Password |
| www.testenv.com | PT      | gui    | 1234     |
| www.testenv.com | NL      | thais  | 123      |
Now, the biggest question: How did I solve the two main issues that I faced during the development?
Shadow Root on Web Elements
A common problem with login pages that UI/UX developers face is encapsulation. Most companies employ a powerful technique, Shadow DOM, to hide their implementation details. To protect the NMBRS product, our DevOps team hides the web component configuration (such as CSS or JS) of a certain element or even HTML section. NMBRS uses Shadow DOM to hide our implementation details and link many shadow hosts to other shadow roots. This allows us to mask up some web components in a Document Object Model (DOM).
In practical words, Shadow Root is a way to hide, and therefore protect, proprietary information.
The first problem appeared in this part. Because the elements were shadow rooted, I had difficulty telling the selenium automation to find those elements. This was difficult since the shadow root blocks all classes and ids from a certain element, which doesn’t allow picking it up like a normal button, for example.
After some research and help from other QAs in my team, I used the command below to find different components. I only had to change the components' class or id. For example, instead of using ‘nmbrs-form’ it could be an ‘nmbrs-button’.
return document.querySelector(’nmbrs-form’).shadowRoot.querySelector(’div div.btn-container nmbrs-button’).shadowRoot.querySelector(’button#button’)
As you can see, there are two Shadow Root elements. This is a query command where the querySelector() grabs the parent component of the child shadowRoot or the final element. Basically, in order to get the information inside the shadow host, in this case ‘nmbrs-form’, you only have to write ‘.ShadowRoot’. This allowed me to tell the selenium which components to find despite the Shadow Root.
After setting up the selenium automation, I had to create a Slackbot to grab the 2FA Authentication code. Both in the live and in the test environment, this code is usually sent to the user's email. However, to automate this in the test environment, this code is forwarded to a Slack private channel. This channel only receives signals and no one except the QA Engineers have access to it. We used Slack because it’s an integral part of our communication and workflow at NMBRS.
Bypassing 2FA with a Slackbot
Every signal that’s generated in the test environment goes directly to the private Slack channel. Due to security concerns around the user data and NMBRS’s policy, I created a Slackbot to grab the 2FA code. The Slackbot was able to ensure security by taking the same steps as a normal user and test velocity while also getting the code.
Integration with Slack
To run the Slackbot on Slack, I had to integrate it with the platform. I created the QA AUTHENTICATION - API to read the emails with the 2FA code on a private channel. This integration was based on Event Subscriptions: whenever we received a new email from the OAuth2.0, the Slack channel notified the Slackbot.
#EVENT SUBSCRIPTION TO KNOW WHEN A NEW FILE IS SHARED
@slack_event_adapter.on('file_shared')
def data_handler(payload):
    if automated_test:
        event = payload.get('event', {})
        file_id = event.get('file_id')

        SlackR = client.files_info(file=file_id)

        SlackMessage = SlackR.data.get("file").get('plain_text')

        if SlackMessage.find(login_email)!=-1:
            code = SlackMessage.split(" ")
            global auth_code
            auth_code = int(code[4])
One con of the Slackbot is that it can’t be run on Azure Pipelines. Our Virtual Machines (VMs) don't have the Slack platform installed. NGROK was used in the Slack app because the tests were made locally on my computer.
NGROK is a local server framework that allows you to expose a web server running on your local machine to the internet. In addition, it provides a real-time web UI where you can introspect all HTTP traffic.
The Slackbot also functions as a Flask REST API, which the selenium automation test and the slack app communicates to via the URL endpoints.
It’s important to make sure the Slackbot receives the notification that a 2FA authentication code was sent and that the Slackbot retrieves the code once it’s been sent. This allows us to prove that we have the newest 2FA code and that it is valid.
Let’s go to the interesting part! I want to share with you the right flow between the automated test (selenium), the Slackbot and the Slack app.
How the Slackbot, Slack app and selenium tests interact
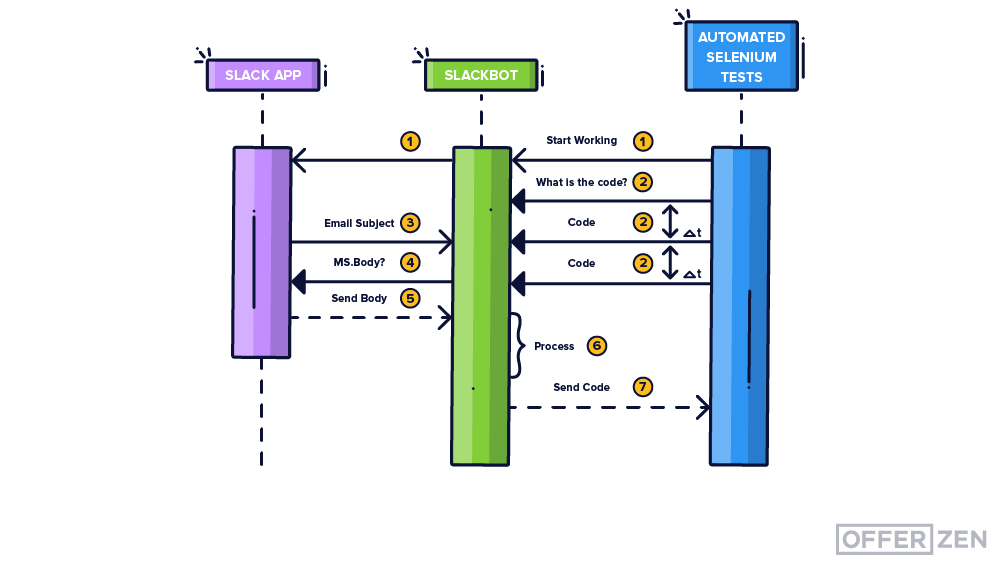
- When the selenium test starts to run, it sends an HTTP request to the Slack App to tell the Slackbot to start listening to the channel.
- When the test reaches the 2FA page, the Slackbot requests the 2FA code.
- The bot listens to all recently-arrived messages with the condition that the signal needs to have the email with the selenium test login first.
- After the Slackbot recognises the email, it requests the body message.
- The Slack app retrieves the body message and the Slackbot puts that into a string.
- Using a Python library, the bot catches the 2FA code.
- The Slackbot sends the code back to the selenium test.
After the 2FA has been completed, the test goes to a Consent Page, where it sees different profiles associated with different accountants. So, again, it is crucial to make sure that all profiles that appear on the consent page are allowed to be there. For security reasons, we don’t want to see profiles that aren’t ours. If we see a profile that isn’t ours, it means that we can access information from other people and it goes against the Authentication and Data Storage Policy.
After that, it’s time for the automated test to click on the ‘allow’ button. An authorisation grant code will be retrieved in the URL, via a specific endpoint, and sent to the Flask app. Then, the unit test grabs the code to determine if it is valid or not.
The authorisation grant code is important because it is the only way to get a newly accessed token and a refresh token. If you don’t have those, you can’t access any information in the NMBRS application.
Finally, with that authorisation grant code, the last step is to access the ‘/connect/token’ endpoint to get a new ‘access_token’ and ‘refresh_token’ with the last ‘refresh_token’.
Last but not least, after generating a new access token, we want to test if the old and the new tokens are different. It must be! This final part is tested by triggering a POST request endpoint from the identity service. In the header we add the access token’s type (in this case ‘Bearer’) and the refresh token. After doing the request, the server will retrieve a response with the new access token on the message body. With this, the testing process is complete!
# GET ACCESS TOKEN VIA REFRESH TOKEN
def get_access_token():
    header = {'Content-Type': 'application/x-www-form-urlencoded', 'Authorization':basicAuthorization_encoded}
    payload = {'refresh_token':refresh_token}
    response = requests.post(baseIdentityURL +  + '/connect/token', data=payload, headers=header)

    if response.status_code==200:
        responseJSON = response.json()
        new_access_token = responseJSON['access_token']

        if new_access_token!=access_token:
            tests["test_message"] = 'Access Tokens are different.'

        return

    tests["test_message"] = 'Access Tokens Not Received via refresh token.'
    return
Pros & Cons of my approach
As with every other approach, this approach has pros & cons.
Let’s start with the pros:
- The Slackbot can test every NMBRS environment.
- The automated test is faster than doing the test manually: The average time for a human is 2-3 minutes to receive the email and input the code; my bot only needs 10 seconds.
- In addition to that, the test can run forever and its dependencies need less maintenance or support.
The cons:
- To run the automated test fully, it needs to have multiple tools open at the same time and depends on multiple platforms. If one of these fails, the bot will fail too.
- Having multiple dependencies running decreases the test’s performance and increases the amount of time taken to run it. However, this is still faster than manual testing.
With these pros and cons in mind, how can we improve our tests? For less maintenance and easier-to-follow tests, it’s important to migrate from tests made locally on my computer to Azure DevOps Pipelines. Our next release will be deployed on Azure DevOps. Migrating would eliminate the Slackbot dependencies and expand these tests for live environments too. Our VMs don’t have Slack installed on them. For that reason, ignoring the Slack integration by bypassing the 2FA with a specific email would be a great solution and it would work for live and test environments.
This was the first time we’d implemented automated testing at NMBRS and it has had a huge impact:
- The current automated test release has enabled the QA squad to save time on testing.
- It allowed us to test everyday, which we were unable to do previously when testing manually.
- With this implementation, the DevOps can be more informed about what is happening and act before the product crashes.
By migrating to Azure Pipelines and removing dependencies, we’d be optimising this even further.
From not knowing how to create automated QA tests to creating one with such a great impact, this has been a productive learning journey, and I look forward to the third release. If you’d like to learn more about my test development, here are some of the key resources I used below.
Tools Used and Useful resources
[1] - OAuth 2.0 Documentation, https://oauth.net/2/
[2] - NGROK Documentation, https://ngrok.com/docs
[3] - Pytest Library, https://docs.pytest.org/en/6.2.x/
[4] - Selenium with Python, https://selenium-python.readthedocs.io
[5] - Flask Library, https://flask.palletsprojects.com/en/2.0.x/
[6] - Azure DevOps, https://azure.microsoft.com/en-us/services/devops/
[7] - Postman API Platform, https://www.postman.com
Guilherme Pinheiro is an energetic and enthusiastic engineer. He is a full-time Electronics & Automation Student Engineer at FEUP, as well as a part-time Quality Assurance Engineer at NMBRS. Outside of his professional life, he is a sports lover and a bookworm.