Users want to know that any confidential information they provide to a website will be protected. That's why modern web applications need to have SSL if they want to be trusted. This, however, can be quite challenging to set up for an ingress controller of an application running on Google Kubernetes Engine (GKE). The biggest challenge for me was a lack of documentation or guidelines featuring an end-to-end implementation of cert-manager and the nginx ingress controller. In this article, I'll show you step-by-step how I went about it by walking you through setting-up your GKE hosted web application with ingress and SSL.

Generally, you can think of an SSL certificate as a kind of public key used in encrypting data that is transmitted between a browser and a web server: when connecting to a website that claims to be secure, the browser will request a certificate from the server. If it trusts the certificate, it will send a digitally signed acknowledgement - which manifests as a green padlock in the address bar!
The project I worked on was a small e-commerce platform running where customers were expected to provide personal information to make online payments. We needed a compatible solution that users could trust to request, renew and apply SSL certificates.
In the case of our application, the browser requests are first handled by the ingress controller, from which the browser will request a certificate. Therefore, the ingress controller needs to know about the certificate, as well as how and where to find it in the cluster. The solution also would ideally be cost-effective, widely trusted, hassle-free to administer, and compatible with our application running in a Kubernetes pod on GKE.
Figuring out what to do: Our SSL solution
After a quick Google search, I happened across the Let's Encrypt project, which provides digital certificates to people enabling SSL and TLS on their websites - and it turned out to be ideal for a number of reasons. It was:
- Highly reliable,
- Widely trusted, and
- Free.
I also discovered that cert-manager, a native Kubernetes certificate management controller, is able to manage the whole process of requesting and renewing certificates, and storing them in your cluster somewhere. In other words, it unburdens you from having to manually update them. It can also help with issuing certificates from a variety of sources: Should you choose to change your certificate provider, you would only need to make a change to one kubernetes object, and the other pieces remain the same.
Getting started
While every effort has been made to make this writing clear and simple, a basic understanding of docker and kubernetes will go a long way to helping you make sense of what we are doing. With that in mind, then, we can start going through what I did to add SSL to my web application.
There are also a few things that you'll need to have, that will not be covered here:
- A Google Kubernetes Engine (GKE) cluster: You can find instructions on how to create your own here. Also install Helm and Tiller, instructions here. This is the main environment where your application will be deployed to.
- A domain name: This is so that your application is accessible over the internet using a human friendly address.
Lastly, here are some of the important concepts worth understanding before we start:
- Helm Chart: This is helpful to understand because we will use helm charts to install cert-manager and nginx-ingress-controller.
- Ingress Controller: An ingress controller is a kind of load balancer, and the entry point of external traffic into our kubernetes cluster. In this example we will use the nginx ingress controller.
- Issuer and Cluster Issuer: These kubernetes object are important parts in requesting SSL certificates from Let's encrypt and storing them in our cluster.
Step 1: Setting up a service with an nginx ingress controller
For the purpose of this article, we will launch a simple nginx container with no special configuration, and all it will show is this:

In this instance, nginx is a web server responsible for serving the HTML page we have showing "Hello" and the docker whale. To launch this pod in your cluster, run:
kubectl run hello-docker-b --image=docker.io/lsizani/hello --port=80 --labels='app=hello-docker-b'
This will create a deployment called hello-docker, which will specify launching an nginx image from the google container registry and open port 80 on the image.
We are not yet able to access our new service from the internet, so our next step will be to make it available.
Let's install our nginx ingress controller using helm:
helm install stable/nginx-ingress --name nginx-ingress-controller --set rbac.create=true
This will create the following resources:
RESOURCES:

==> v1/ServiceAccount

NAME                      AGE

nginx-ingress-controller  2s

==> v1beta1/ClusterRole

nginx-ingress-controller  2s

==> v1beta1/ClusterRoleBinding

nginx-ingress-controller  2s

==> v1beta1/RoleBinding

nginx-ingress-controller  2s

==> v1beta1/Deployment

nginx-ingress-controller-controller       2s

nginx-ingress-controller-default-backend  2s

==> v1/Pod(related)

NAME                                                       READY  STATUS             RESTARTS  AGE

nginx-ingress-controller-controller-f6dbd6cb9-2xknm        0/1    ContainerCreating  0         2s

nginx-ingress-controller-default-backend-5dbd6c6575-ddtnp  0/1    ContainerCreating  0         2s

==> v1/ConfigMap

NAME                                 AGE

nginx-ingress-controller-controller  2s

==> v1beta1/Role

nginx-ingress-controller  2s

==> v1/Service

nginx-ingress-controller-controller       2s

nginx-ingress-controller-default-backend  2s
Also, it will tell you that this is what it has done. The beauty of installing our ingress controller using helm is that helm will do most of the work for us.
Next, we create a backend-service for our new pod. This backend service will be a resource of type ClusterIP - a service that allows the ingress controller to route traffic to the pods which match its label. Let's see the spec:
**apiVersion**: v1

**kind**: Service

**metadata**:

  **labels**:

    **app**: hello-docker

  **name**: hello-docker-svc

  **namespace**: default

**spec**:

  **ports**:

  - **port**: 80

    **protocol**: TCP

    **targetPort**: 80

  **selector**:

    **app**: hello-docker

  **sessionAffinity**: None

  **type**: ClusterIP

**status**:

  **loadBalancer**: {}
To create this resource in our cluster, we write our spec in a .yaml file and run (you can name the file anything):
kubectl create -f cluster-ip.yaml
This service will be assigned an IP address that is accessible within the cluster (hence: cluster IP), and it will be listed on port 80. It will then pass along any traffic directed to its IP on port 80 to its underlying pods, also on port 80. In case it is unclear, had the pods been listening on port 3000, then targetPort would be 3000 and the service would send traffic to port 3000 of the pod.
The next piece of the puzzle is to set up an ingress resource. This is what will get us external access to the service. Here is a spec for our ingress resource:
**apiVersion**: extensions/v1beta1

**kind**: Ingress

**metadata**:

 **name**: hello-docker

 **annotations**:

   **kubernetes.io/ingress.class**: nginx

   **nginx.ingress.kubernetes.io/ssl-redirect**: "false"

**spec**:

 **rules**:

 - **http**:

     **paths**:

     - **path**: /

       **backend**:

         **serviceName**: hello-docker

         **servicePort**: 80
To create this resource in our cluster, we write our spec in a .yaml file and run:
kubectl create -f ingress.yaml
Before we continue, here's a quick recap of what we have done so far:
- First, we created a deployment called hello-docker which launched a single pod with a hello-docker label.
- Then, we created a ClusterIP (service) that gives internal access to pods with the hello-docker IP.
- Finally, we created an Ingress resource that exposes the service to the internet, allowing us to view the application from a browser.
Still on track? Awesome! Now, to see our running app, we find the external IP from our ingress-controller. In order to do this, run:
kubectl get services
It essentially lists all the services running under the default namespace. This is my output:
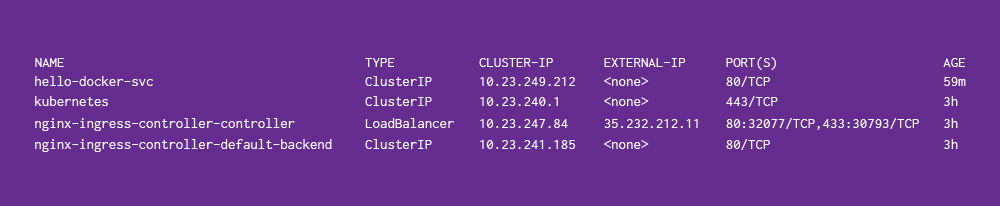
The IP we're interested in is EXTERNAL-IP of the nginx-ingress-controller-controller. When I click on that address, it shows me my page with "Hello!" and the docker whale. If everything is working correctly, you should see the same thing.
Step 2: Install cert-manager
Cert-manager will be responsible for requesting an SSL certificate on your behalf and also renewing it as necessary. Official documentation can be found here.
Before we get into installing cert-manager, you will need to assign a domain name to that external IP. Working this out depends on a number of things that I cannot discuss here right now, so hopefully you know how your configure your DNS!
We will once again use helm to install:
helm install --name cert-manager --namespace kube-system stable/cert-manager
If you were successful in installing nginx-ingress-controller using helm, then you will most likely be able to install cert manager without any issues.
Cert-manager needs to be able to manage your DNS entries to add/update SSL certificates as needed. To give it the correct access, we create an IAM policy for it, with role DNS Administrator. We then get access keys for the IAM service account and store them as kubernetes secrets. The script below does this:
#!/usr/bin/env bash

ROBOT=clouddns

DNS=your-project-id

gcloud iam service-accounts create ${ROBOT} \

    --display-name=${ROBOT} \

    --project=${DNS}

gcloud iam service-accounts keys create ./${ROBOT}.key.json \

    --iam-account=clouddns@${DNS}.iam.gserviceaccount.com \

    --project=${DNS}

gcloud projects add-iam-policy-binding ${DNS} \

    --member=serviceAccount:${ROBOT}@${DNS}.iam.gserviceaccount.com \

    --role=roles/dns.admin

kubectl create secret generic clouddns \

    --from-file=./clouddns.key.json \

    --namespace=kube-system
You can save the script to a file and run:
sh create-sa.sh
When this completes successfully, we can begin with getting SSL certificates for your app!
Step 3: Creating a certificate issuer
We will need to do certificate issuing twice: the first time is to get a test certificate in order to ensure that we have all our pieces working correctly. This will be evident when a certificate is successfully applied. The second, then, is to associate the certificate from your issuer with the domain name that you have configured for your app.
With the first certificate issuing, the test certificate comes from a staging environment on Let's Encrypt. Considering that the staging environment has less restrictions on access compared to the production environment, it is a good place to first iron-out any kinks in your setup. We begin by creating a resource of type ClusterIssuer:
apiVersion: certmanager.k8s.io/v1alpha1

kind: ClusterIssuer

metadata:

  name: letsencrypt-staging

  namespace: default

spec:

  acme:

    server: https://acme-staging-v02.api.letsencrypt.org/directory

    email: your-email-address@gmail.com

    privateKeySecretRef:

      name: letsencrypt-staging

    dns01:

      providers:

      - name: clouddns

        clouddns:

          serviceAccountSecretRef:

            name: clouddns

            key: clouddns.key.json

          project: your-project-id
To create the issuer in your cluster, you run:
kubectl create -f cluster-issuer.yaml
To check that nothing went wrong, you can run:
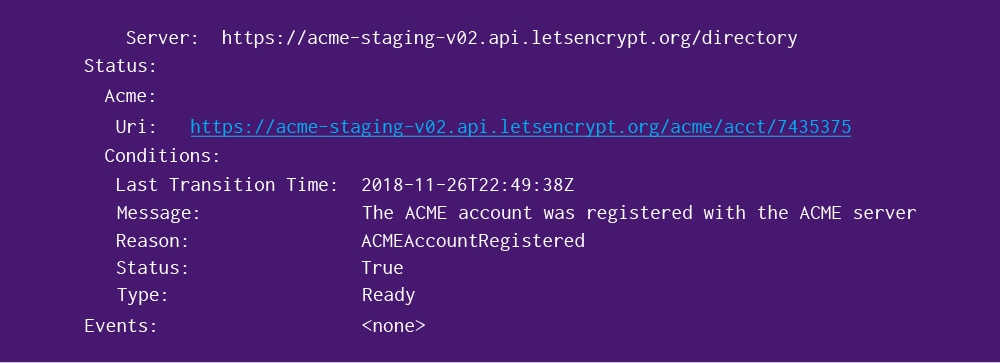
kubectl describe clusterissuer letsencrypt-staging
You want to lookout for Status block, which shows the status of a request to ACME to obtain an account for SSL registration. Mine comes back with:
The next part is to associate the certificate from your issuer with the domain name that you have configured for your app. I set my app to use app.hello-docker.tk, so that will be the domain for which I request a certificate. This is the spec for the certificate resource (remember to replace my domain name with your own):
apiVersion: certmanager.k8s.io/v1alpha1

kind: Certificate

metadata:

  name: hello-docker-stg

  namespace: default

spec:

  secretName: hello-docker

  issuerRef:

    name: letsencrypt-staging

    kind: ClusterIssuer

  commonName: app.hello-docker.tk

  dnsNames:

  - app.hello-docker.tk

  acme:

    config:

    - dns01:

        provider: clouddns

      domains:

      - app.hello-docker.tk
To create a certificate in your cluster, run:
kubectl create -f ssl-cert-stg.yaml
It takes about two minutes to complete the certificate request, but to check on its progress you can run:
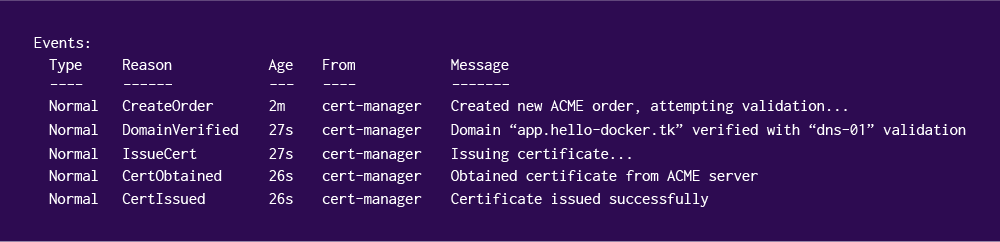
kubectl describe certificate hello-docker-stg
When mine completed successfully, this was the output on the events section:
Now that we know that our setup works, we will create another issuer to get us a production certificate. The spec is very similar to the one we already have:
apiVersion: certmanager.k8s.io/v1alpha1

kind: ClusterIssuer

metadata:

  name: letsencrypt-production

  namespace: default

spec:

  acme:

    server: https://acme-v02.api.letsencrypt.org/directory

    email: your-email@gmail.com

    privateKeySecretRef:

      name: letsencrypt-production

    dns01:

      providers:

      - name: clouddns

        clouddns:

          serviceAccountSecretRef:

            name: clouddns

            key: clouddns.key.json

          project: your-project-id
To create this issuer in your cluster, run:
kubectl create -f cluster-issuer-prod.yaml
If that completes successfully, add a certificate resource:
apiVersion: certmanager.k8s.io/v1alpha1

kind: Certificate

metadata:

  name: hello-docker-prod

  namespace: default

spec:

  secretName: hello-docker-prod

  issuerRef:

    name: letsencrypt-production

    kind: ClusterIssuer

  commonName: app.hello-docker.tk

  dnsNames:

  - app.hello-docker.tk

  acme:

    config:

    - dns01:

        provider: clouddns

      domains:

      - app.hello-docker.tk
Then, create the certificate in your cluster:
kubectl create -f ssl-cert-prod.yaml
You can then look at its status periodically with:
kubectl describe certificate hello-docker-prod
Once you have been issued a certificate, you need to inform your ingress controller that you have a certificate it can use. First, export the ingress controller deployment:
kubectl get deployment nginx-ingress-controller-controller -o yaml
This will output the deployment in .yaml format. We then want to add a line in the deployment, at the args stanza. This is what the args stanza should look like after editing:
  - args:

        - /nginx-ingress-controller

        - --default-backend-service=default/nginx-ingress-controller-default-backend

        - --election-id=ingress-controller-leader

        - --ingress-class=nginx

        - --configmap=default/nginx-ingress-controller-controller

        - --default-ssl-certificate=default/hello-docker-prod
The line we added is:
- --default-ssl-certificate=default/hello-docker-prod
When you're done editing, save the file and run:
kubectl apply -f ingress-deployment.yaml
If this completes without any errors, you should see it recreating the ingress-controller pod. To check on this, run:
kubectl get pods
You should see the ingress controller pod within a few seconds or a few minutes, depending on how long ago you ran apply.
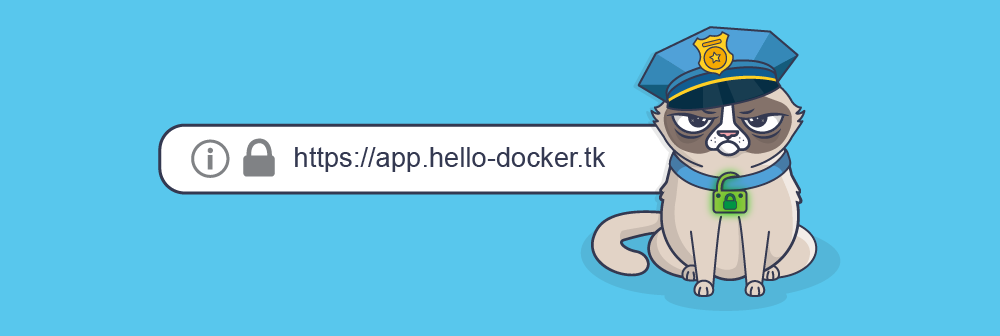
And now, with all of that done, when you visit your domain on a browser it will have a valid SSL certificate! This is what I see:
Summary and final comments
We started out by deploying a docker image to our kubernetes cluster. Then, to make this application visible and accessible from outside the cluster, we gave it a ClusterIP and an Ingress. We were able to add and configure the ingress the way we did because we also installed an ingress controller to our cluster.
This nginx-ingress-controller can be used to expose other services that we may be interested in adding to our cluster, like having a customer-facing frontend and a backend API and even a separate admin frontend. However, they would most likely be available under the same root domain. Setting up additional sub-domains would only require creating more certificate resources.
For anyone interested in taking this a step further, something that might be cool to look at is adding a wildcard certificate. In essence, this would allow you to have one SSL certificate that applies to all of the services under your ingress controller. If you do tackle that, I'd love to hear what you have to say about the process, and what you found particularly valuable or interesting!
Lunga Sizani is a Software engineer at 2U Inc. He has just over five years experience working as a software developer with a variety of technologies. One of his favourite pastimes, which incidentally happens to also be his day job, is to solve problems he is isn’t officially “qualified” to be solving - because how else does one learn?