As the infrastructure team that provides Kubernetes infrastructure to our development teams, one of the challenges we faced was enabling self-service access to cluster resources. This isn't always easy because you need to provide the right level of access, without compromising the security of your environment. In this article, I'll explain the approach and tooling that helped us accomplish this.

Our team ran a range of services for our organisation, all of them related to infrastructure and software delivery. Most of these services were relatively small, and we deployed them on virtual machines with Chef. This meant they required very little maintenance, but also that our resource utilisation was low. As we started adding more tooling to the environment and splitting out some shared services, we started looking into hosting some of our services on Kubernetes in order to get better resource utilisation on the hosts and make it easier to replicate the services.
We also wanted to see if Kubernetes was something we wanted to offer to other teams in the organisation. But, things got a little complicated when we wanted to give cluster access to different users. We didn't like the idea of having to reload the API server when we added or removed accounts. So, we opted for the client certificate authentication model, created some certificates for our team and started moving some of our services to the brand new Kubernetes cluster. Our team had a lot of success running services in the Kubernetes cluster and we wanted to make the cluster more widely available.
The first team we onboarded was very much a manual process. Much like we did for our own services, we created a namespace for them, assigned some permissions and provisioned client certificates. We quickly realised that, if we wanted to enable more teams and handle different users joining and leaving, we needed to automate the onboarding process. If we kept adding teams ourselves and setting up their credentials and authorisation rules, there would be too much support work for us to keep up with.
What we set out to do
Our organisation already had a system that could verify employee identities with username and password combinations. This system is updated as part of the human resource processes, so being able to integrate with it meant that we didn't have to verify user accounts or check if people had left the organisation. With this in mind, we could set some of the requirements for on onboarding process. The new process had to:
- Enable self-service to create cluster credentials
- Integrate with the external authentication service
- Set a sane default security context
- Allow users to manage their own namespaces
- Allow users to belong to multiple namespaces
- Enable workload isolation
These few rules helped inform some of our design decisions and set the constraints that we had to satisfy.
General approach and thinking
Armed with our requirements, we started going into more detail on how to build what we needed. We were going to provide users with access to resources on the cluster, so we had to solve both authentication and authorisation. These are two closely-related, but different, concepts.
Authentication (authn) deals with identifying clients. A consumer of a service provides an identity to the service which can be verified by means of a password, token, certificate or something else. Once the identity has been verified, the consumer doesn't necessarily have access to any resources. All that has been verified at this stage is who the consumer is. Typically a failed HTTP authn request would result in a 401 UNAUTHORISED response status, which means that the user's credentials could not be verified.
We thought about the authn workflow that we wanted users to follow in order to get access to the cluster, and realised:
- We needed a client-side component that could write the certificates to filesystem and update the user's Kubernetes config file with the fields necessary to access our cluster.
- The certificates would be short lived. So, if a user left the organisation, their certificate would expire and wouldn't be renewed because they wouldn't be able to authenticate against the organisation's identity system.
- It had to be quick and easy as users would frequently be renewing certificates.
- The client certificates had to support multiple groups so that we could use groups to allow users to access different security policies.
Our process for providing authn was:
- Download client binary
- Verify organisation credentials
- Look up user's identity in Vault
- Request signed certificate from Vault
- Write config and certificate to filesystem
Authorisation (authz) verifies access to resources for each identity. It does not validate the identity at all, but assumes that the validation has already been done. Authz would apply the relevant access policies for the specified consumer.
Typically your authn system would validate the user credentials, then your authz system would consider what they are allowed to access given that this consumer is who they say they are. Failed authz checks would typically result in a 403 FORBIDDEN response status. This means that we were able to verify the identity of the consumer, but that they didn't have the necessary permissions to access the requested resource.
Our process for providing authz was:
- Enable user to request a namespace
- Create namespace
- Set relevant permissions and quotas for the namespace
Handling Authentication
We had a good idea of how we wanted the authentication to work:
- A user would download the client binary for their platform and initialise their config for our cluster.
- This would prompt them for their organisation password, so that we could validate their credentials.
- We would pass the username and password on to the central identity system to check if the credentials were correct and that it was a valid account.
- Once we knew that the user had a valid organisation account, and had provided the correct credentials, we needed to** **look up their identity to see what groups that user belonged to.
- Using the identity, we would generate a certificate signing request which we could sign and return to the user.
- The client binary would then write the certificate and key to the file system and update the user's Kubernetes client config to be able to use the new certificate and cluster.
Before addressing the steps above, it's useful to understand why we use Vault, how the certificates get interpreted by Kubernetes, and why it's been done this way.
Firstly, Kubernetes uses 2 fields from the client certificates for identity: It uses the common name for the user, and the organisation field to determine which groups the user belongs to. x509 certificates can have multiple organisation fields, which allows users to belong to multiple groups. In our environment, we use groups to enable privilege escalation; so we needed somewhere to store information about which users belong to which groups.
Considering the above, we found Hashicorp Vault to be a good fit for handling the Kubernetes cluster identities: We could create identities for new users, and later update them by adding them to groups if we wanted to grant them access to different security policies. Vault can issue the client certificates and has authentication integration in Kubernetes. We set about writing the server-side component that would allow users to request access.
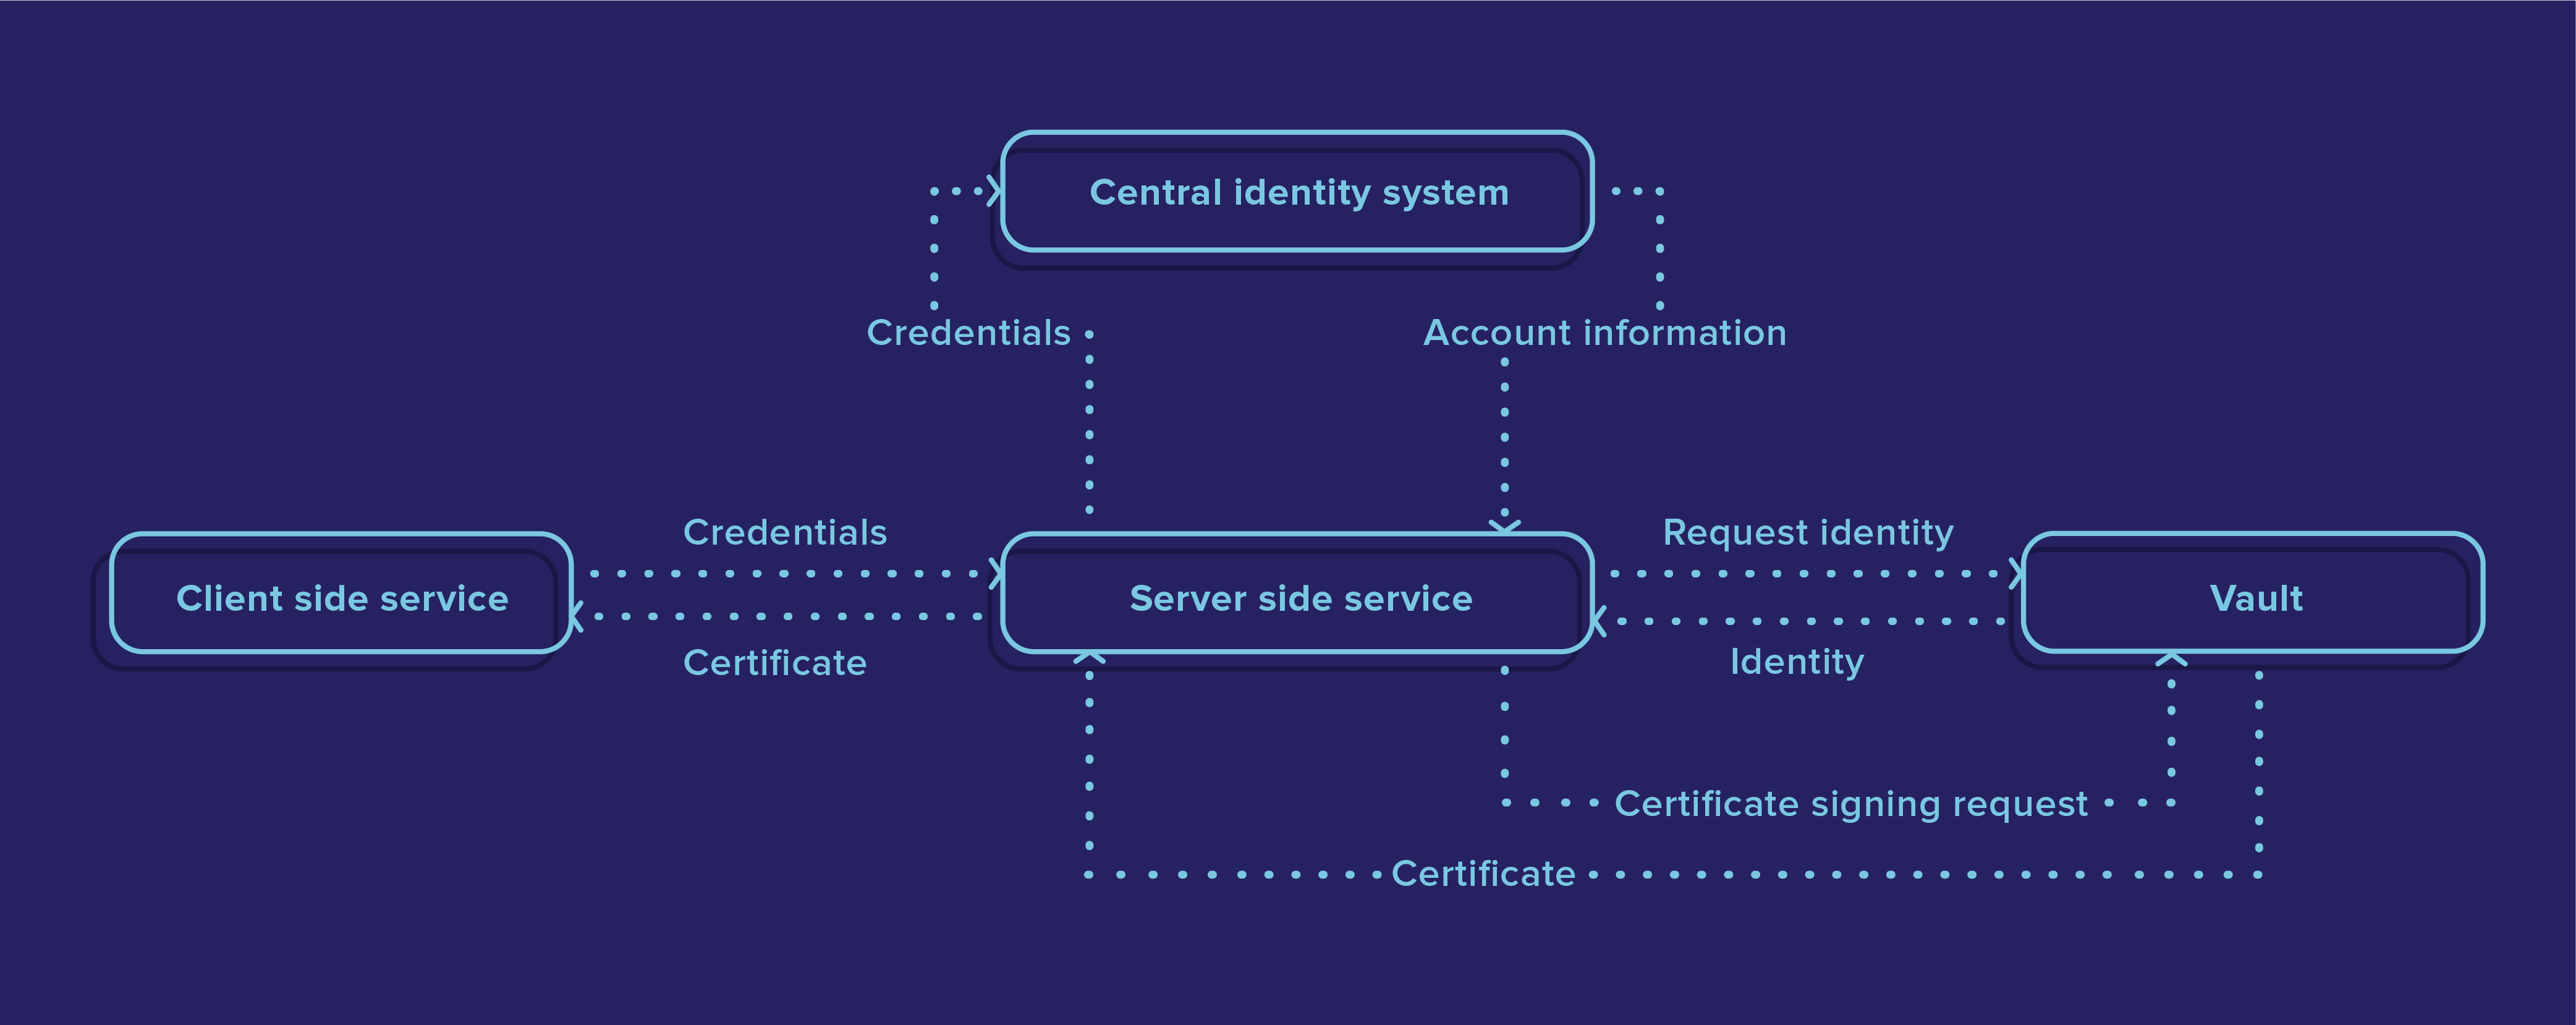
The graph above relates to the steps mentioned above: The client service first sends the user's credentials to the server. The server then validates the credentials against the organisation identity service, and requests the identity from Vault. If the identity doesn't exist, a default identity is created. The server uses that identity to create a certificate request, which includes the username and organisations, and sends it to Vault to get it signed. The certificate is then returned to the client where it is written to the filesystem. Renewing a certificate follows the same process.
In order for our service to authenticate against Vault, we had to setup the Kubernetes integration in Vault.
Vault's Kubernetes authentication method uses a service account to call the Kubernetes token review API to validate Kubernetes service accounts. To use it, you need to create a service account in Kubernetes and bind it to the system:auth-delegator role. You then need to provide the Kubernetes authentication method in Vault with the jwt for that service account.
You can find the jwt by getting the service account token:
kubectl -n $NAMESPACE get secret $(kubectl -n $NAMESPACE get sa $ACCOUNT -o jsonpath='{.secrets[0].name}') -o jsonpath='{.data.token}' | base64 -D
With that setup, Vault can authenticate Kubernetes service accounts.
Once Vault was configured, we needed to set up our service to request a token from Vault and use the token to access the API.
This was relatively easy to do by adding a sidecar to our service that would handle the authentication and make the token available. We created a pod that runs 2 containers. The first container was running our service, the second running the Vault agent. We added the same EmptyDir volume mount to both containers that would store the current token. The Vault agent then would use the Kubernetes service account to authenticate against the Vault server, and write the token to the shared volume. Our service would read the token from the shared volume and use it to access the API so that the token is always valid.
With this service running, our users could easily request access to the Kubernetes cluster and get the default read-only access to most of the cluster resource. We still needed to add a way for users to be able to request namespaces and access cluster resources in order to run workloads - which is handled by authz.
Handling Authorisation
Our authz workflow would provide a mechanism for users to request namespaces. If we granted users permissions to create their own namespaces via kubectl, they wouldn't have the correct quotas, limits and network policies applied. We needed to delegate that task to something else.
We opted to grant namespace permissions to specific users, instead of groups as it made it easy to lookup which accounts had access to which namespaces.
When a user requests a namespace, we need to apply our default set of rules, grant their user edit permissions for the namespace, and enable them to add or remove other users to the namespace. Since group membership isn't set up in Kubernetes itself, but is presented to the API as part of the client certificate, adding groups to namespaces would make it difficult to see which namespaces specific users had permissions for. If we want to see who is in a group, we would have to look that up in Vault and not Kubernetes.
Once we had the authn portion ready, we needed to add a command that users could run to provision a namespace with the correct security configurations. Our options were to add the command and support for it to the client, or use another service to create namespaces and keep the client only for authn.
We opted to use the client binary to manage just authn, and add a chatbot for other Kubernetes-related tasks.
We already used chatbots quite extensively in the environment, so it was consistent with the way most of the environment worked. Anything that required permissions elevated above what we'd typically grant users, would be added to the bot. That way, there is a clean audit history, of who has requested what, that is visible to all users. Users can see what commands get called and use them as a reference, so that if something goes wrong with a command it's easily visible and easy for us to provide support.
The bot also allows for more complex workflows that could require approvals. For example, the rules and permissions around requesting QA namespaces are different to that of the development environments. Using a bot, instead of adding a command to the client, allows us to add an approval button in the bot's reply. This means that someone with suitable permissions can authorise the request in a way that it's visible to everyone.
We added a new bot that could create namespaces and configure them for users.
Following the same pattern with Vault, the bot will use its token to access the Vault API. When a user requests a namespace, the bot will first validate the user's chat account in Vault and then ensure that they have Kubernetes access already. The bot has a service account in Kubernetes with the necessary RBAC rules which allows it to create namespaces, rolebindings and policies. However, Kubernetes doesn't allow an account to assign permissions to another account that it doesn't already have itself.
For example, an account with permissions to create a rolebinding, but without permission to create deployments, wouldn't be able to create a rolebinding that allows another account to create deployments. Because of this, we also granted the bot the default edit role that we usually give users. If the user had a valid identity in Vault, and requested a namespace, the bot would:
- Create the namespace
- Set the resource quotas
- Set the default limit range
- Set the default network policy
- Create the edit role binding for the user
- Add the edit-role-bindings rolebinding for the user
This approach has helped various teams get started with Kubernetes in our organisation. We've found that people can easily access resources and deploy workloads on the shared infrastructure while they are transitioning to services that are suitable for Kubernetes.
For dedicated infrastructure or other environments, we still have to intervene to add annotations to the namespaces for the different image policies and scheduling rules. But, for teams to get started on Kubernetes, we've found this setup to be simple and effective.
Stephen Breyer-Menke is a developer-turned-infrastructure automator. He enjoys bringing together different technologies while still writing code to leverage them and, has a passion for building platforms that are easy for people to use.