When we look at technologies in isolation, their potential seems limited. Combine them, however, and the possibilities grow exponentially: A simple project in my living room that grows chilli plants is a perfect case study of how you can leverage the power of big data and the cloud to integrate technology in your physical world. We will go through each part making up the system and at the end combine them to create an augmented reality system.
Building an augmented reality system
If we take the long Wikipedia definition of augmented reality and reduce it to the most basic idea, it’s an advanced version of reality. I personally approach it by using a combination of technologies and tweak the system so that I can communicate with it in a natural way. That’s why the chili-growing project in my living room incorporates a computer vision system, IoT and a smart assistant.
It’s not about the technology but what it allows you to do
I got this idea when I read about the collaboration between Jeff Bezos from Amazon and Satya Nadella of Microsoft. They opened up their respective smart-assistant platforms, Cortana and Alexa, to be used by both Microsoft and Amazon. The two companies are now not really trying to sell you their voice assistants anymore. Instead, they are using them as a portal to the rest of their business: By opening up their smart-assistant platforms, they make it easier than ever before to reach the rest of their products and services.
This made me realize that it is not about the technology anymore but rather about what that technology allows you to do.
Growing chilli plants with the help of augmented reality
My initial idea was to come up with a project that combines my passion for IoT and Deep Learning in a novel way - a fun opportunity to play around, but also something that people could relate to. Making it all about growing chilli plants is a thought I had later, just to have a fun (read: yummy) and practical way of demonstrating the potential of my system. I love tinkering, being creative and combining technologies in weird ways without worrying about specific processes -that’s the benefit of home-projects in comparison to work ;-)
I was pretty excited because I set out to do something that I did not know would work until late in the development process. Although all three technologies on their own are well researched and established, the idea of using computer vision to gain a contextual understanding of its surroundings is a novel idea. It made a lot of sense in my head but I had no idea whether I could make it work in practice. I wanted to be able to:
- Detect an object, i.e. one of the common objects in the COCO dataset,
- Know the type of the object, i.e. a plant and
- Identify individual plants, i.e. distinguish one chilli plant from the other.
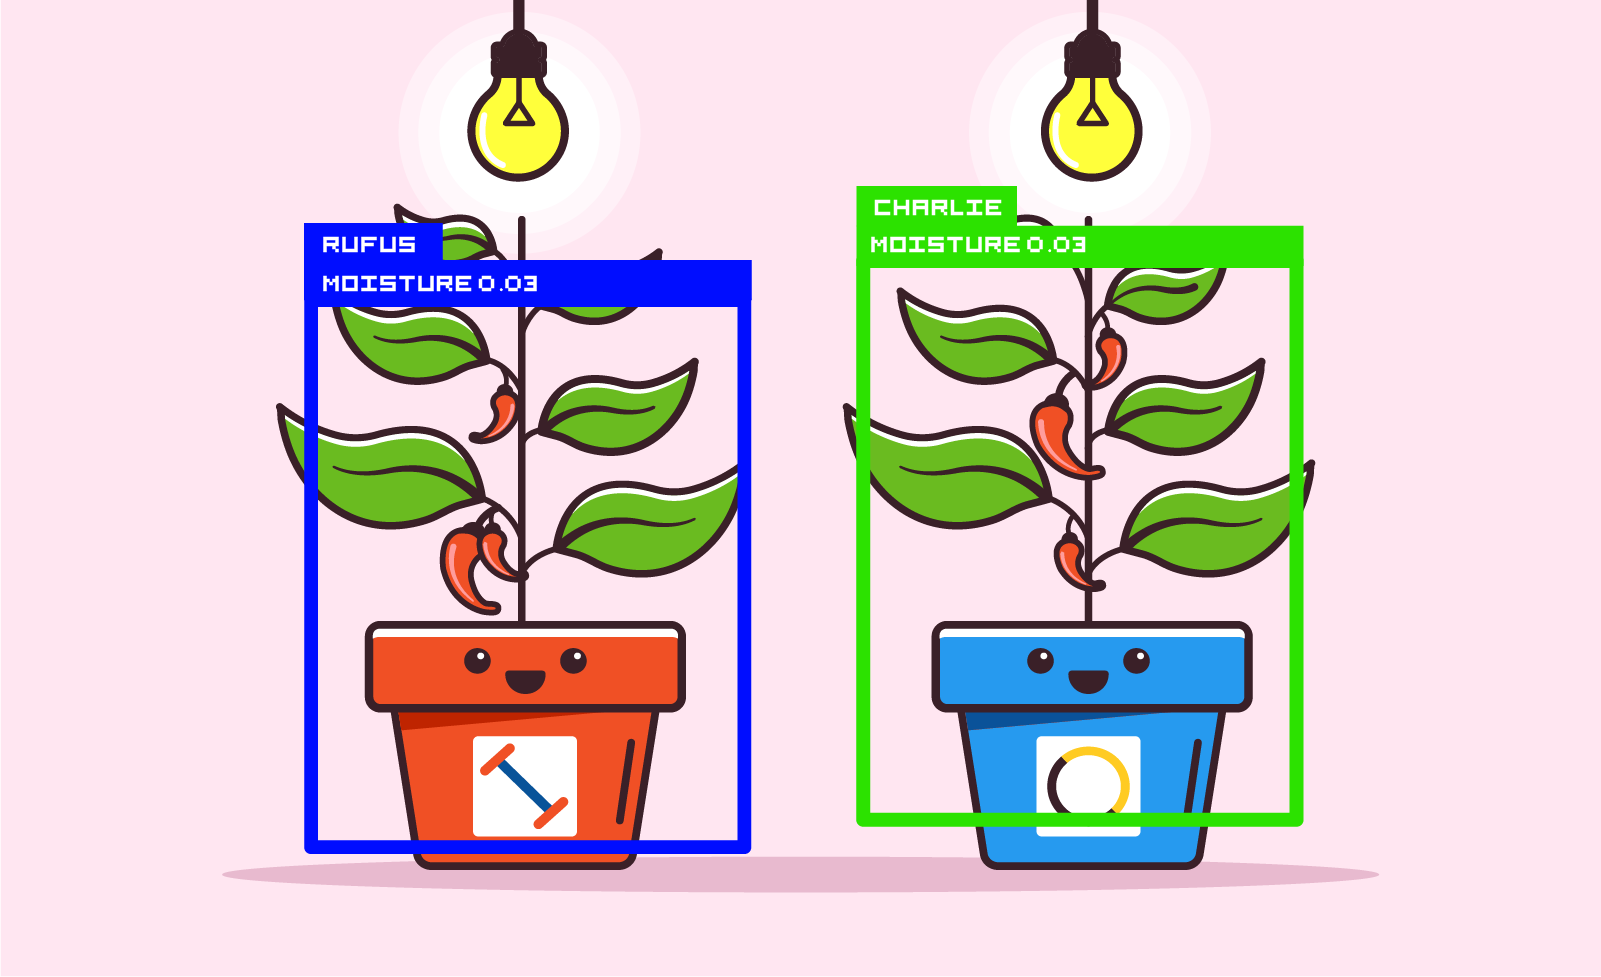
All of the measurements I was collecting from the IoT devices would now belong to an identifiable object. I called my chilli plants “Rufus” and “Charlie” and can now fetch data for each plant individually. That's how my system builds a contextual understanding of the environment which allows me to target each plant individually based on individual measurements.
Using IoT, I could monitor or control at least two aspects of the system:
- The soil moisture levels and
- The light exposure by switching a growing light on or off.
Using Computer Vision, I would be able to:
- Get a contextual understanding of the environment by locating the plants in the real world from a video feed.
- By identifying the plants in the real world, they could be linked to real-world-data collected by the IoT devices.
- Enhance reality by adding an information overlay and thus creating an augmented reality world.
Using a Smart Assistant would then allow me to interact with the system by talking to it naturally and command it to:
- Get feedback for individual plants and
- Switch a growth light on or off that targets individual plants.
I had never grown chillies before, so learning more about the plants was a really nice side effect of this decision. It’s basically impossible to learn about chillies without learning about the Scoville Scale. That’s why I decided to go big and buy Dorset Naga plants, whose chillies are reported to be one of the top 5 hottest chillies in the world!
Growing chillies, as it turns out, works like growing most other plants: Chilli plants want regular water and lots of sunlight! You can image the moment of pure joy I felt when I finally pointed my webcam at my chilli pot plants and the system could both detect and identify the individual plants and draw a box around them with their names on the screen:
Here’s how I set this up:
IoT: Collecting plant-pot-data & controlling the system from the cloud
To me, IoT on its own is kind of boring. What excites me is how it can be used to let our gadgets interact with our environment. It’s predicted that, by 2022, there will be 29B devices connected to the internet - 18B of which will be IoT devices. In 1999, Bill Gates used the analogy “Digital Nervous System” to describe the then modern enterprise. Today IoT gives this “Digital Nervous System” senses, a finger on the pulse. It changes the way we do business, take measurements and generate data which gives companies the ability to closely monitor operations and make future predictions based on real time data.
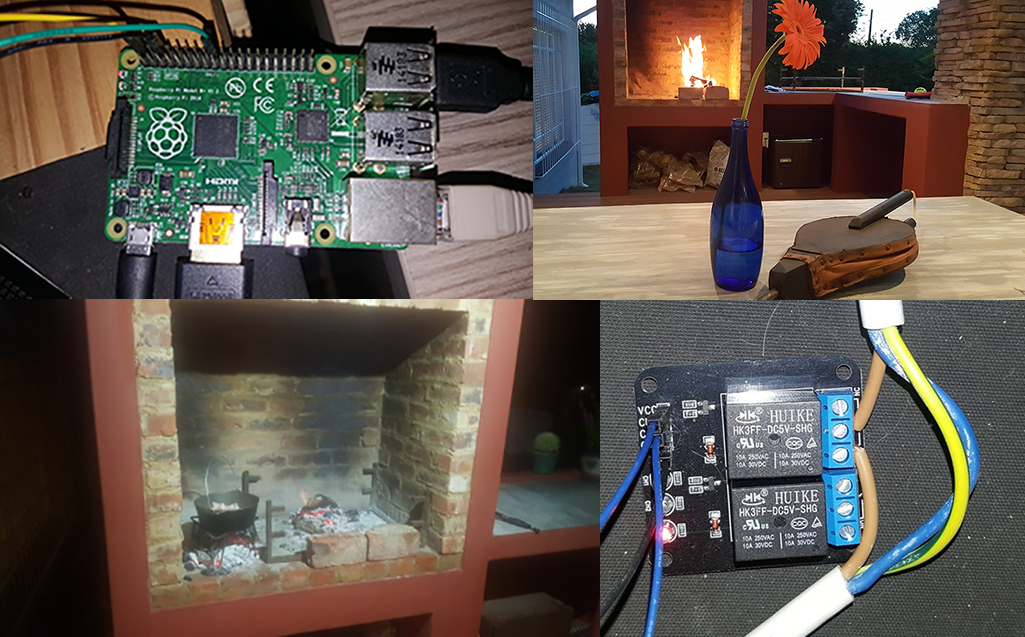
The Raspberry Pi was a big game changer for me - I could combine my passion for programming with my childhood hobby of electronics. My house quickly became a lab for experimentation, for finding ideas that no-one else in the community seems to have thought about. That’s also why I can now use Slack on my phone to switch my braai-light on - all thanks to a Raspberry-Pi.
For my chilli-growing-project, I decided to use IoT devices to measure light and soil moisture levels and send those values to the cloud. I realised that it would also be useful for the IoT device to control parts of the system from the cloud - for example allowing the system to control a plant growing light.
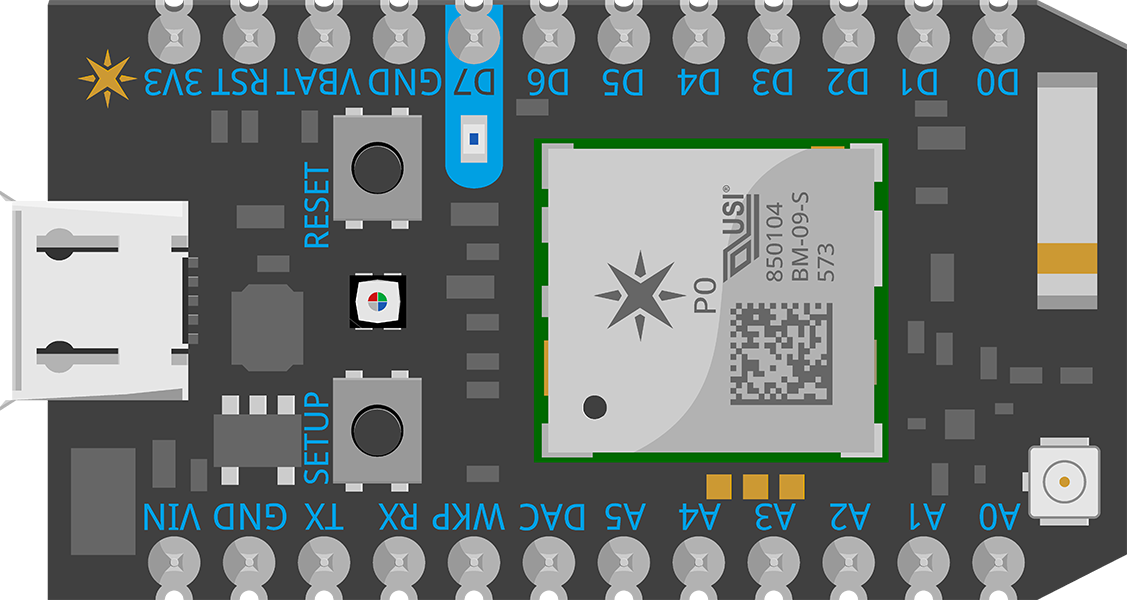
For this, I chose a Particle Photon. It has seven analog pins ideal for collection sensor values and six digital pins that are perfect for controlling aspects of the system from the cloud.
Particle Photons: Collecting data
There is more to IoT the just the device. When I looked around for an IoT device I wanted a device that was easy to connect to the internet, cloud support and came with lots of example code, the Particle Photon ticked all the boxes:
- Particle cloud back-end
- Full featured Web IDE
- Over-air firmware updates
- Awesome maker community: hackster.io has hundreds of projects from community members
Using a light sensor
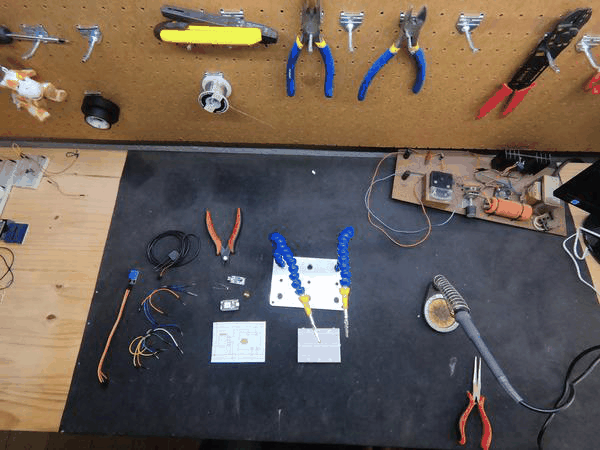
The light sensor (a seperate sensor) is connected to one of the analog pins of the Photon and to the ground pin of the circuit. Building the circuit is where my childhood-hobby of electronics comes in handy. The circuit is build by using a breadboard - using the connected rails of the breadboard connections are made between the sensors and the pins of the particle photon, effectively creating a circuit. The sensor measures the light resistance and converts it to a percentage value that is easier to relate to: 0% would be completely dark and 100% would equate full light exposure.
Chilli plants generally need lots of sunshine and moist soil. I measured the amount of light my plants were exposed to so that I could make an informed decision on whether to turn the growth lights on or off. For this, I checked the light readings after dawn and before dusk. I would switch individual lights on when the reading for the respective plant dropped below 0.6 and off when the reading rose above 0.6.
The purpose of the project wasn’t to be intelligent and decide when to switch grow lights on or off, but rather to give me the information and* control* over parts of the environment.
Note: The ability to micro target individual objects might not be significant when dealing with only a handful of objects but could be extremely useful when dealing with objects at a large scale.
Using a soil moisture sensor kit
In order to make sure I was watering the chilli plants optimally, I used a soil moisture sensor kit that works similarly to the light sensor. It consists of the sensor, the probes that you stick into the soil and the connectors you use to connect to a circuit. It records the resistance on the probes and converts the values to a percentage. 0% would equate to complete dryness whereas I’d have drowned my plant at a 100% moisture level. In my experience, the chilli plants were most happy if I kept the moisture levels above 80%.
Note: There is absolutely no scientific backing for this, I simply base this number on my idea of what a healthy and happy chilli plant looks like.
Using Photon to stream measurements to the Particle Cloud
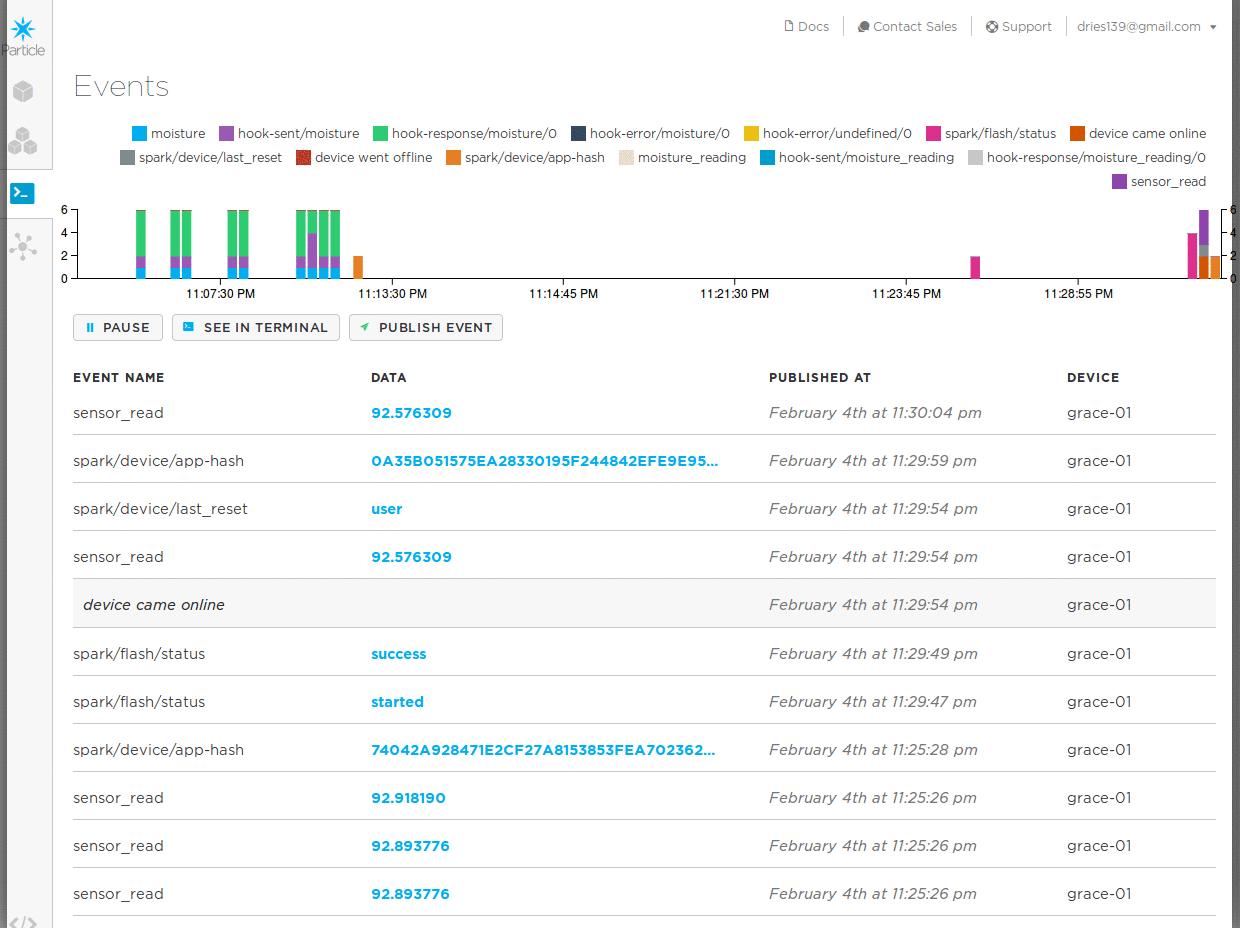
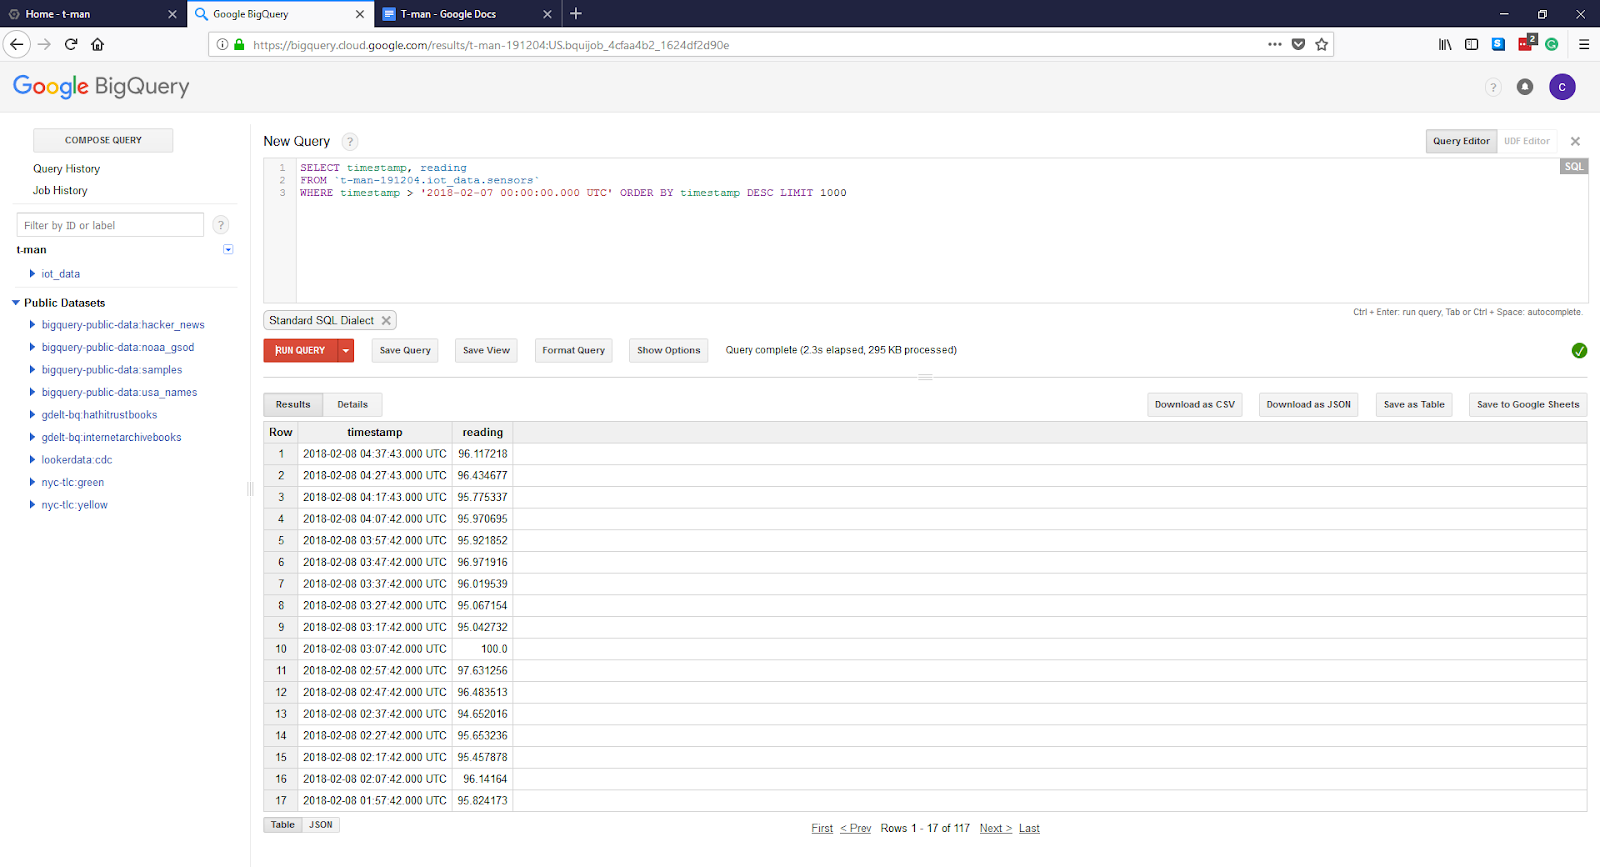
In order to stream data to the particle cloud, I needed to connect the Photon to WIFI and allow it to stream its sensor readings to the particle cloud. Built-in libraries send data directly from the particle photon to the particle cloud. A cloud integration is used to stream data from the Particle Cloud to Pub/Sub, the Google cloud messaging service. For our project, the Pub/Sub also functions as the entry into the Google Cloud. The end goal is to stream the data into BigQuery. For this, I used Dataflow. We will look at each of these steps in more detail.
Using the Particle Web IDE, I wrote a program that runs on the particle photon. It collects sensor values from the sensors and sends those values to the particle cloud:
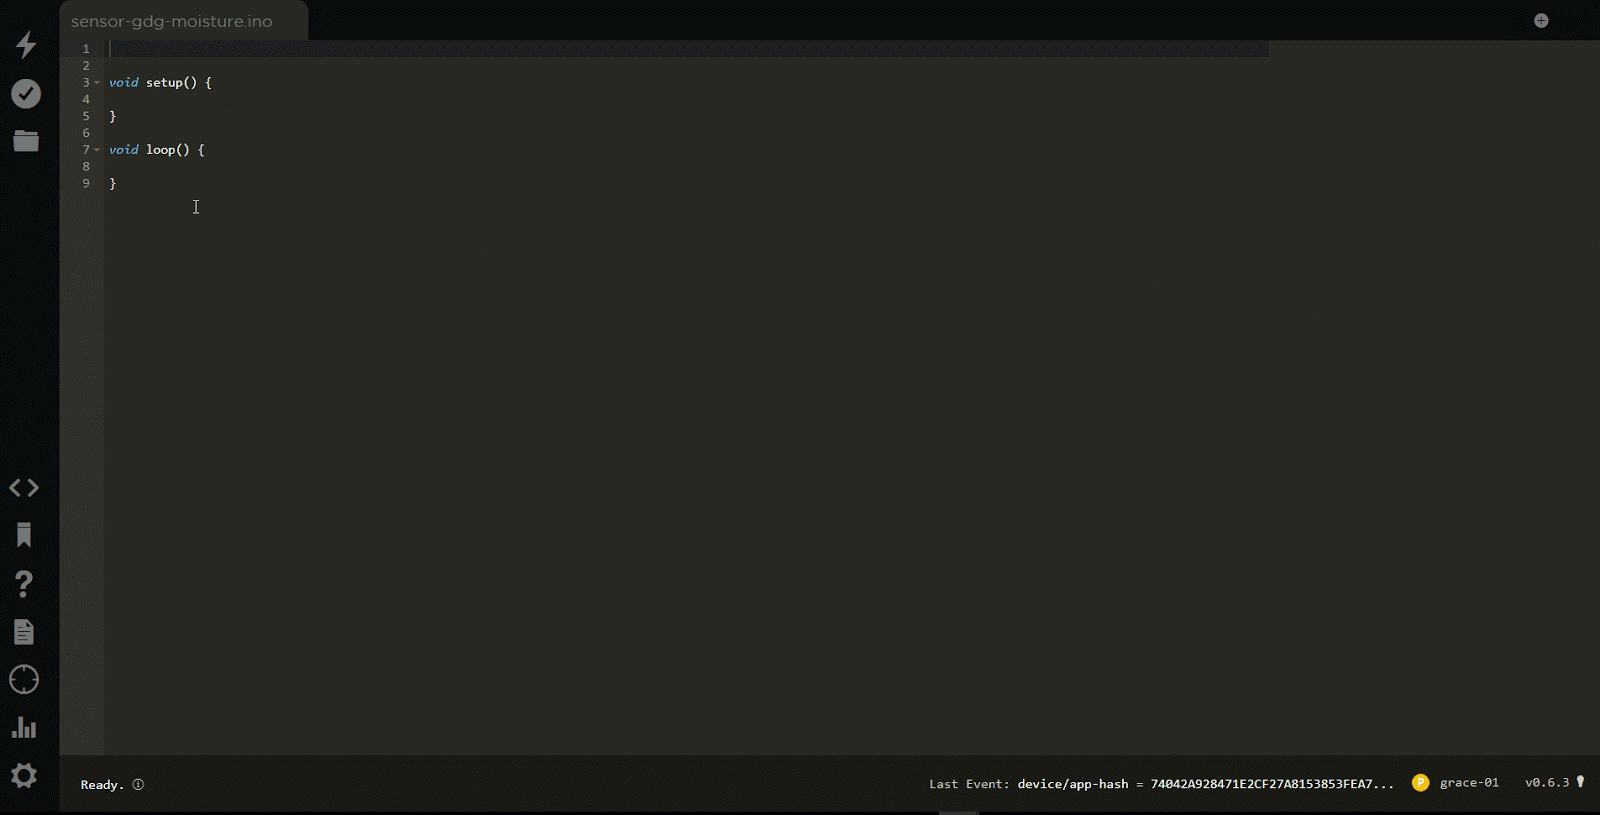
If you look at the animated gif above, a particle photon program consists of two parts: a setup and a loop. In the setup you declare your variables and do your initializations. The loop is a function that is continuously called. This is where you do measurement readings that are sent to the cloud. For this, I used the built-in library and published the values to a specific topic. Take note of the topic, your cloud integration will use this topic later to stream data to pub/sub.
Use a web integration to stream values from particle cloud to Pub/Sub
After I had started streaming data from the IoT device to the particle cloud, I needed to make sure that the data is sent to Pub/Sub by setting up a cloud integration. The cloud integration is the link between the particle cloud and the Google Cloud Platform.
There are two main things that need to be done when setting up an integration:
- Create a topic: This is important because your webhook will relay messages to this topic, and dataflow will later on subscribe to the topic to stream data to BigQuery.
- Create a particle user: To create a trust relationship between the particle cloud and the Google Cloud, a particle user is created. You'll make the user a member of the Google Cloud and give them rights.
Controlling the system from the cloud
Now that I had data streaming from the edge to the cloud, it was important to create a communication channel from the cloud back to the edge. This communication channel would be used to switch the growth lights on or off. The particle cloud exposes a REST API and it is possible to set up a callback on the device that's listening to specific incoming messages.
Using a 5V relay to switch a light on
The growth lights use 220V AC power, the power you get from a normal power socket. The particle photon circuit however operates on 3.7V DC as sourced from a mini USB power supply.
To be able to use a 3.7V DC from the particle photon to switch on a 220V AC growth light, I used a relay.
I used a 5V relay and connected it to the digital pins of the particle photon as well as directly to the growth lights. This would allow me to switch on the lights from the internet. In the same loop as the measurement readings are done, the system also listens for incoming messages from the internet and decides how to handle them. To control the growth lights, I wanted to either set the selected digital pin to 1 or 0 (3.7V or 0V).
The Particle Photon collects data from sensors and streams them to the cloud. It is also possible to send messages to the Particle Photon from the internet. The Particle Photon listens for messages and will fire an event if a specific message is received, thus making it possible to control aspects of your environment from the internet (e.g. switch a specific growth light on or off from the internet). The IoT part of the project is now in place.
Integrating Computer Vision
Computer Vision with deep learning at its core has surpassed human level accuracy in tasks that we once thought only humans are capable of: self-driving vehicles, medical diagnostics and, as my system is showing, getting a contextual understanding of our surroundings.
A good example of Visual Object Identification (VOI) is the facial recognition feature of Google Photos. From thousands of photographs Google can identify your family and friends, even your pets. Now, that's really great when dealing with individuals that each have different visual characteristics, but not very useful in a factory where all the machinery looks the same. That's why I had to come up with a different approach. A simple and practical way to identify objects.
To learn more about computer vision through deep learning, I initially built a Raspberry Pi system that could recognise objects by pointing a webcam at them. Then, I added object identification and integrated the object classification with IoT. That’s where it becomes exciting for me: Using computer vision in combination with IoT devices and sensors to gain a contextual understanding of an environment.
The information I can gather with the sensors is then not just translated into table-values hidden in a database somewhere. It’s now an object I can detect and identify from video. To me, this is what it means to “enhance reality”.
Here’s how I did that:
Using stickers to identify individual plants
In order to assess each plant’s individual health, my system had to be able to distinguish one from the other. This would help me to get more contextual information about Charlie and Rufus, such as individual soil moisture values. Identifying individual objects is vital to link the visual aspect of the project with the collection of information in the environment.
A while back, I stumbled on the interesting idea of using stickers to fool neural networks. Turns out, it’s quite easy to make a neural network think that a photo of a banana is that of a toaster. The trick? Showing the neural network a sticker and teaching it to associate a specific thing with that sticker. That’s the trick I used for my chilli plants. The 2 stickers I used to for Charlie and Rufus are hand drawn and completely random.
Training a convolutional neural network
I trained a convolutional neural network (CNN) to recognise the stickers in various scenarios. This works by showing the CNN thousands of images of the different classes and making small adjustments based on fancy algorithms that optimize the training process. Then you repeat until the CNN becomes really good at recognising objects on images it has not seen before.
To make sure the model generalized well across different light conditions, angles and a constantly changing environment, I generated +/- 3000 images with a webcam that I continuously moved around. I also had to ensure that the CNN differentiated on the actual stickers and not background features. That's why I kept mixing up the backgrounds.
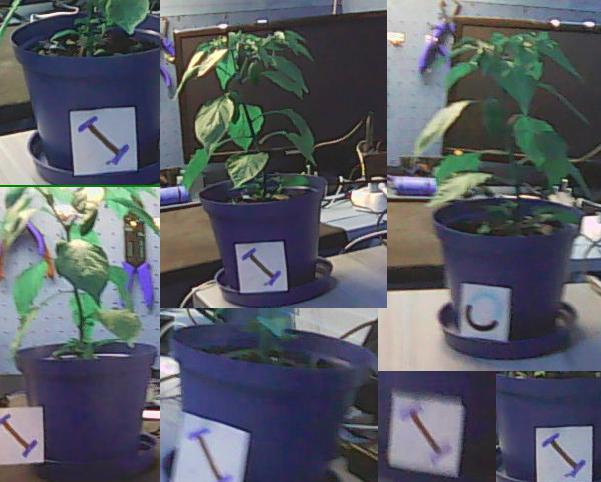
Below, we can see the system recognising the individual plants based on the sticker.
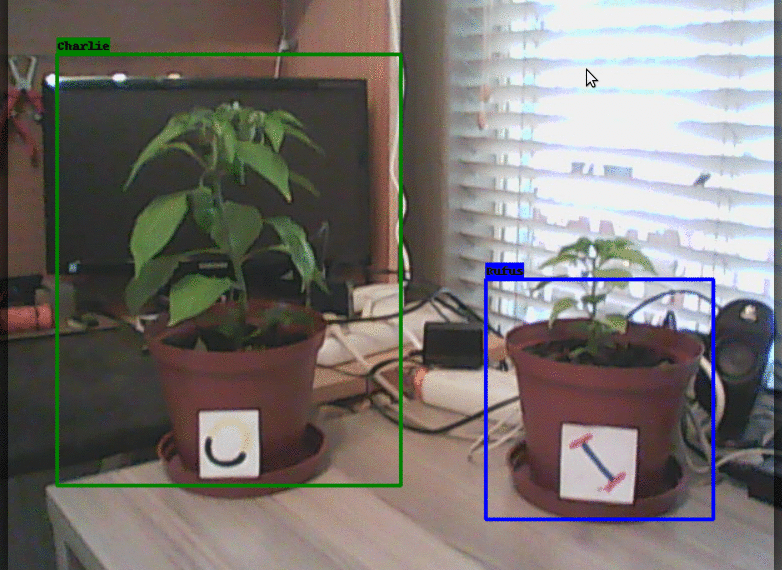
And to prove that the model is actually identifying the plants based on the individual stickers, the image below shows the system working, even when swapping the stickers around.

The training of CNNs is computationally intensive. I did all my development and training on an Ubuntu desktop with an i7, 32GB of RAM and a NVidia GTX1070ti GPU. On ordinary laptops or desktops without a GPU, the training would have been incredibly slow.
That's why it's a good idea to look at cloud options to train your models. Google, for example, gives you free access to powerful GPU computing through their Colab platform which has been specifically created for students and hobbyists. The Azure and AWS platforms are also excellent platforms for Machine Learning.
I developed the system with Python 3.5, TensorFlow and the help of this guide. This really helped me to set up my machine for data science, and will be a life saver for those of you still stuck on a windows machine (Hint: machine learning is so much easier on Linux).
I finally had a system with a contextual understanding of the environment it is in. It could now:
- Collect measurements from the environment using sensors and stream those values to BigQuery in the cloud.
- Use computer vision to identify individual objects in the environment.
- Link the identified to real-world-data collected by the IoT devices and overlay the the video feed with the contextual information.
All I had to do was to link the data collected by the IoT devices with the real world objects identified by the computer vision and create an interface. The logical next step would probably have been to create an android app, but I wanted to go one step further: What if I could interact with my chilli growing system in a natural way?
Voice-controlling my chilli-system with Smart Assistants
Smart Assistants have become the voice controlled hub for smart homes and, by extension, could become a natural proxy to an “augmented reality” or other complex systems. The speech recognition capabilities of smart assistants allow to interact naturally with a system.
For my chilli-growing system, I used the Google Smart Assistant. This was more a practicality because I already had the Google Home and Google Home mini speakers. The speech recognition capabilities of the Google Home Assistant are excellent - recognising my voice with my rather strong Afrikaans accent is something it does better than my wife :-)
Setting up speech recognition in DialogFlow
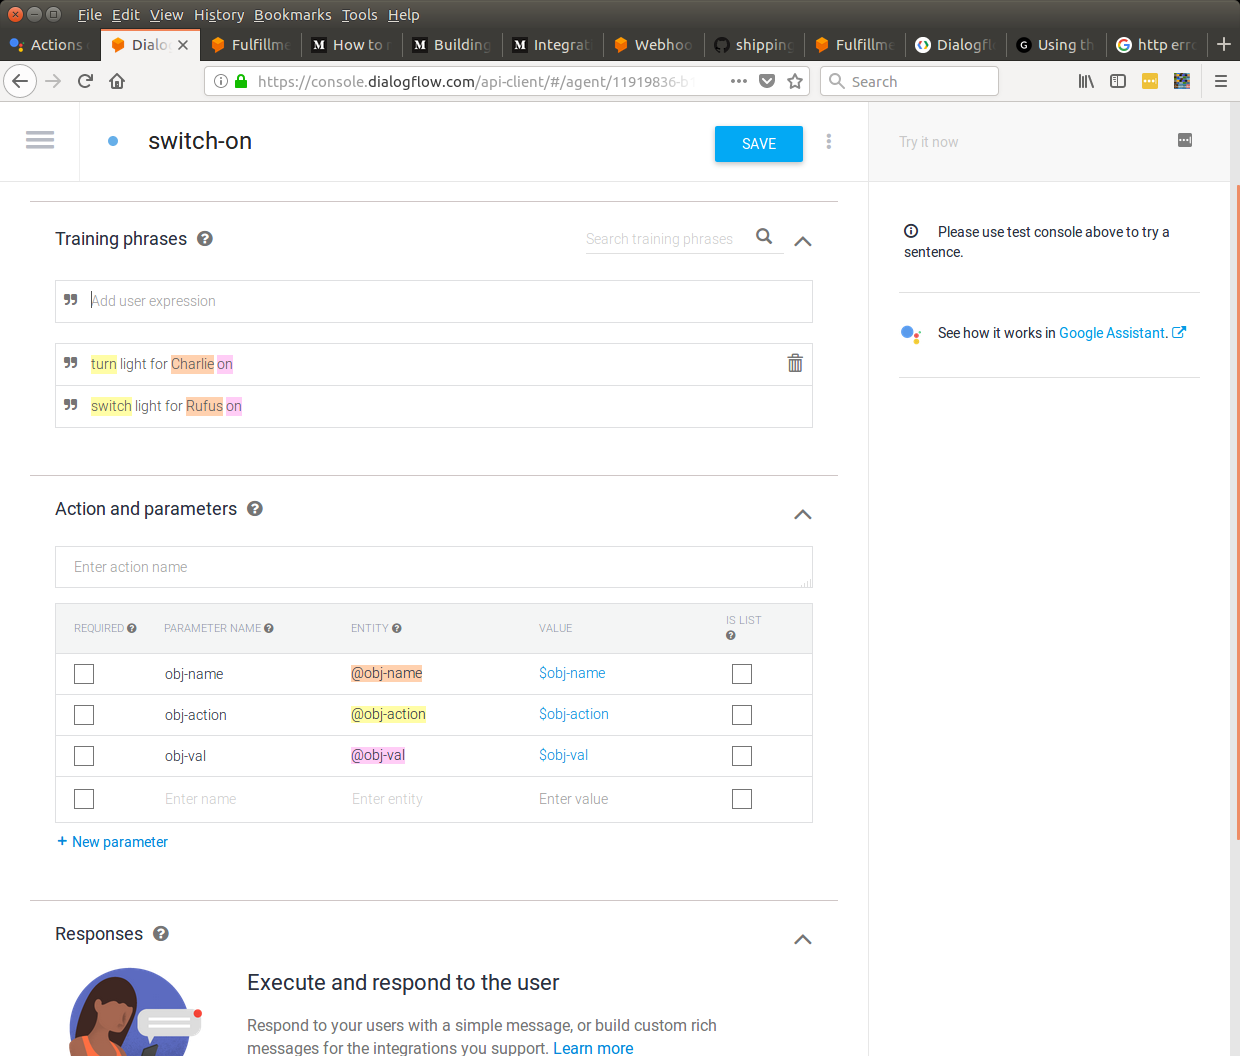
To set up the speech recognition of my system, I used the Google Home Assistant and the DialogFlow framework.
- Step 1: Teach DialogFlow the intent to switch a light on. Essentially, you train the framework by giving it examples of how you would speak to the system, and guide it to extract intent and context. The more training samples you give it, the better DialogFlow will become at understanding your speech and variations.
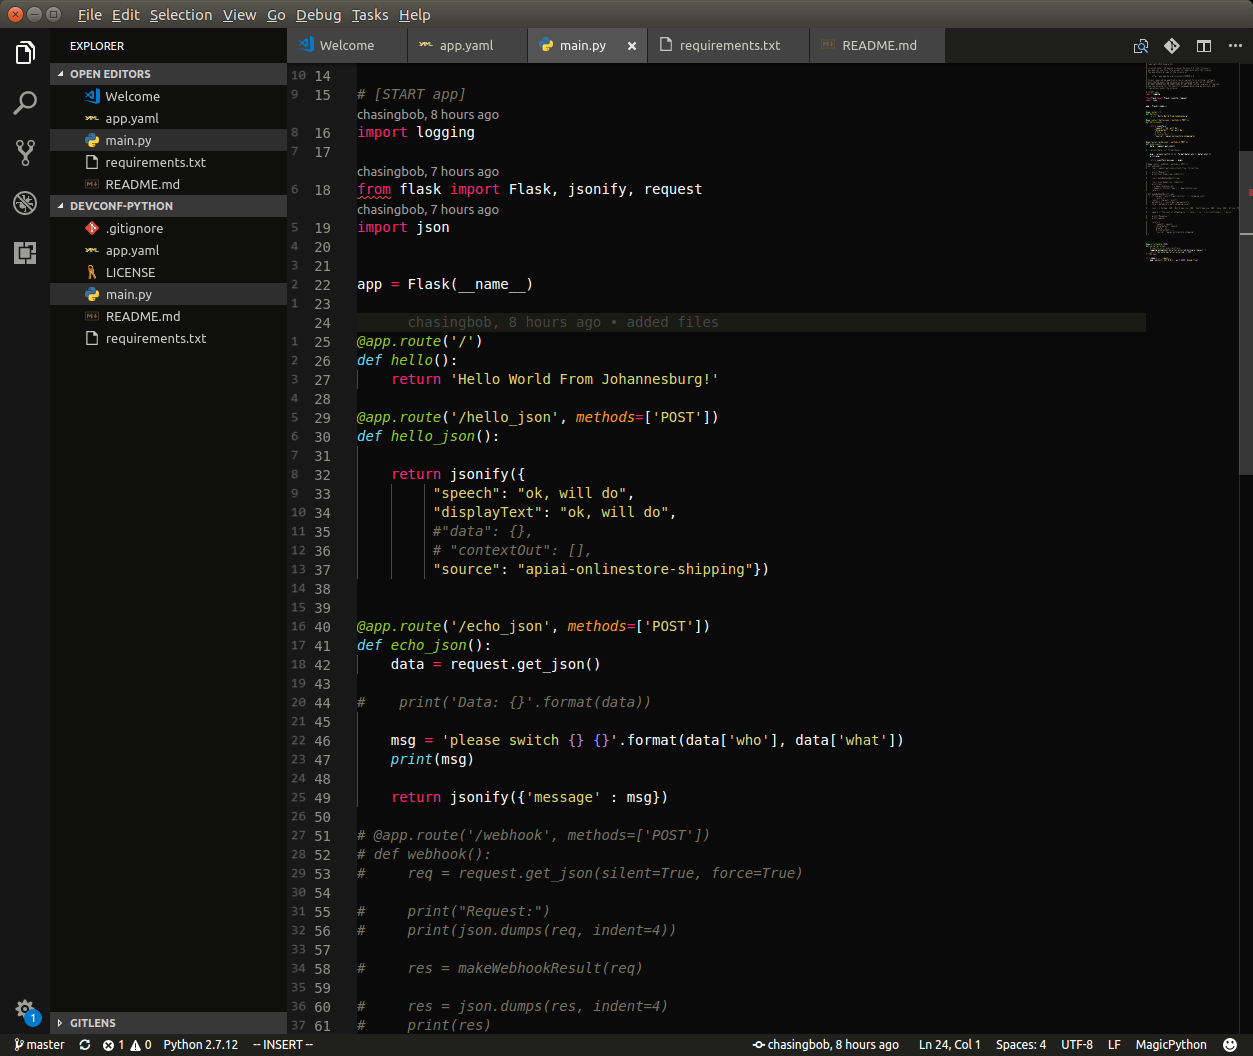
- Step 2: Connect the detected intent to an action with Flask One of the loose ends in communication is between the intent extracted by DialogFlow and the action taken. If the action, for example, is to switch a light on, we need to somehow let the IoT device know to switch the light on.
I used a Flask web service to handle DialogFlow intent and to decide what to do based on the intended action.
Flask is a lightweight Python web service framework hosted as a Google Cloud function in a managed environment. That makes it ideal for building a web service API. DialogFlow communicates back to the outside world by making a HTTP post to a REST API, in my case the Flask API.
Note: Even though it might come across as if I’m a Google salesman, I have built the system like lego blocks: each block could be swapped against a different technology. That means instead of using the Home Assistant, you could use a Slack or Alexa integration.
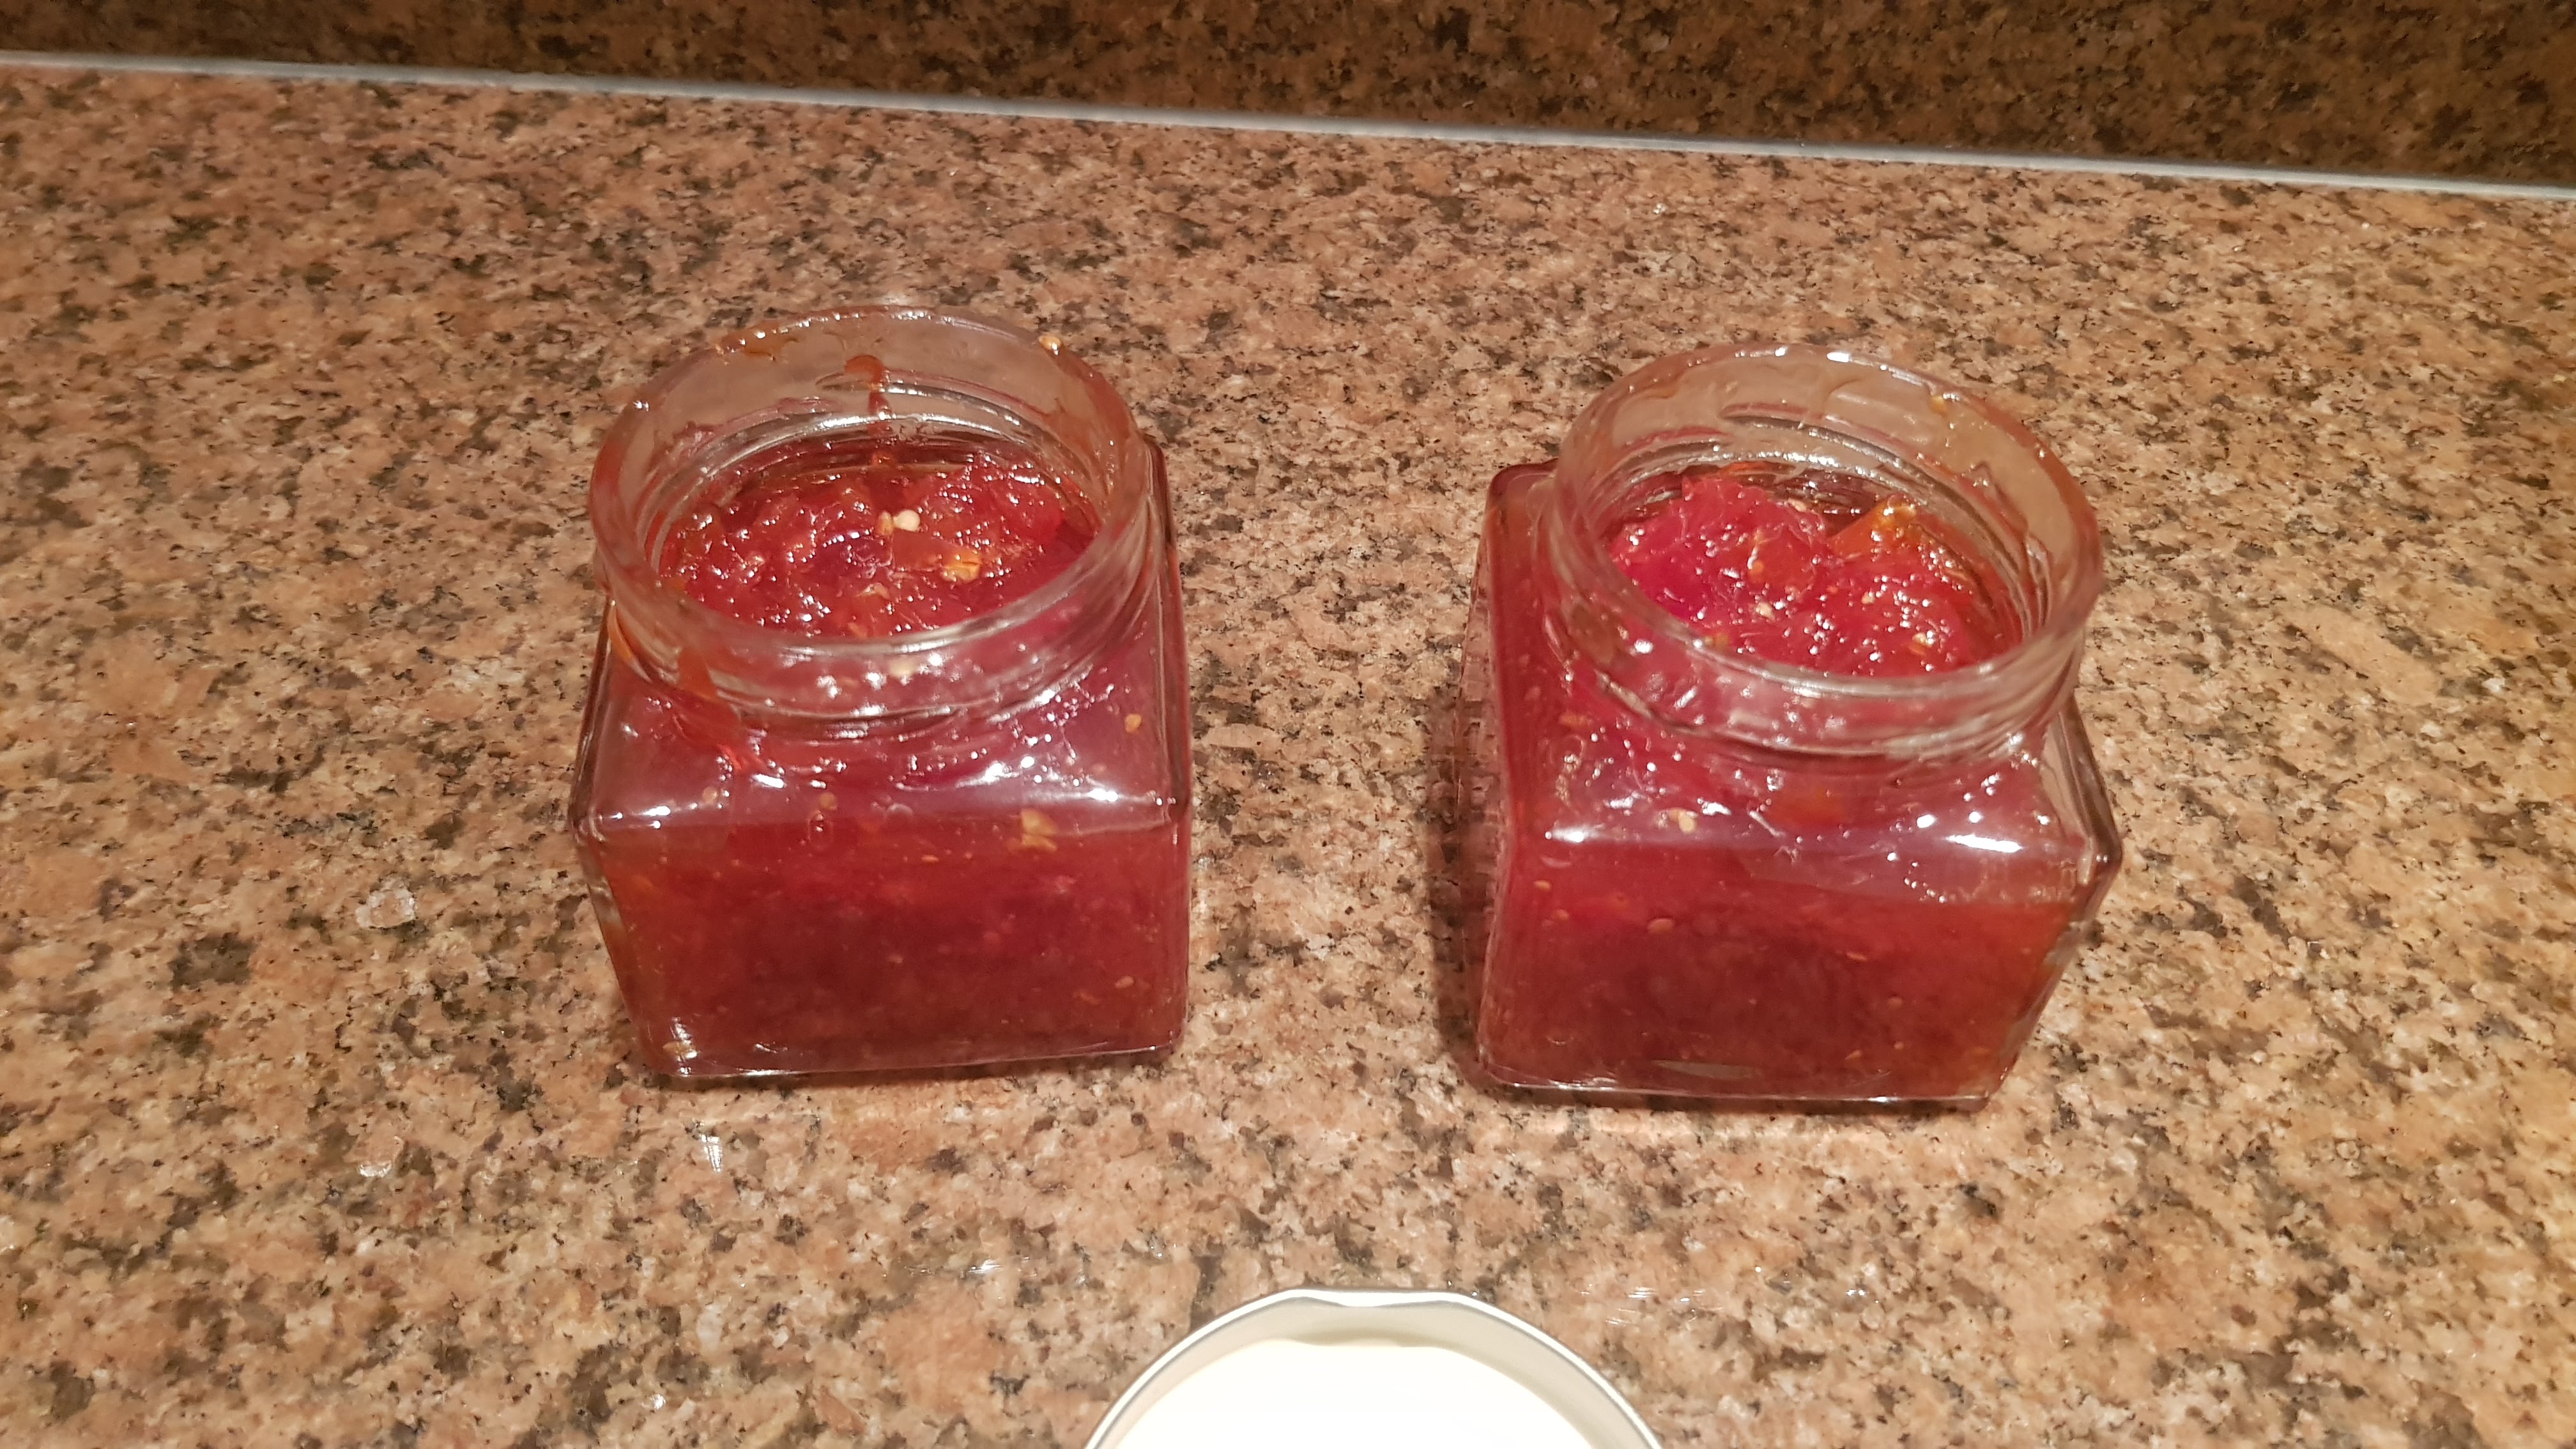
Now, if the success of a project is measured by the hotness of chillies, I am claiming victory. I managed to raise two beautiful chillie plants. A single chilli from Charlie turned a sticky tomato and pepper concoction into a hot yummy jam:
Now it's time for you!
I challenge you to go out and find applications for the ideas I presented to you here. Contact me and lets see how we can work together to make your dream come true!

Dries is the AI lead at vehicle recovery company Tracker. Designing AI and cloud strategies, supported by tools and processes, is at the core of his daily endeavour towards AI excellence. When not building AI systems, Dries speaks at events, co-organises the Google Developer Group Cloud MeetUp and blogs.